

I had such a hard time choosing just one dessert for the holiday season! If I have more time on my hands, I would have make the Mont Blanc cake and the earl grey mousse verrines but it is just impossible between my travels and fashion and photography projects. I guess I will save them for New Year and Chinese New Year.
Between baking icebox cookies, matcha madeleines, and sesame cookies as holiday gifts, I squeezed in some chocolate caramel tarts for those special someone – that includes those who celebrate your birthday in December (hush and don’t tell anyone) ^^
I have seen the tarte au chocolat in almost all chocolate books I own but was never tempted to make it until I tasted one on a recent trip to Chicago. It must be the caramel (I’m mad about caramel) because after one bite I felt the urge to replicate it and share this yummy treat with all of you! I have not used just one single recipe but a combination of a couple from varies books and you know, added little bit of this and that =)
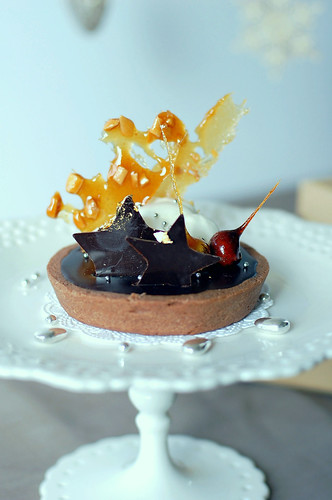
Also, many have asked me on how to make caramel-glazed hazelnuts (needles) since they saw it here. Therefore, I included a how-to with this recipe. Please note not to stab your mouth when you eat it; pick it up on the stem/needle and eat the glazed nut first. Anyway, this tart will satisfy chocolate cravings of those who seriously love chocolate! Well, it certainly sated my craving for chocolate for a while!
Have a wonderful Christmas filled with joy and laughter, everyone! Best wishes for a prosperous new year!!!
Before dressing up with glitz and sparkle: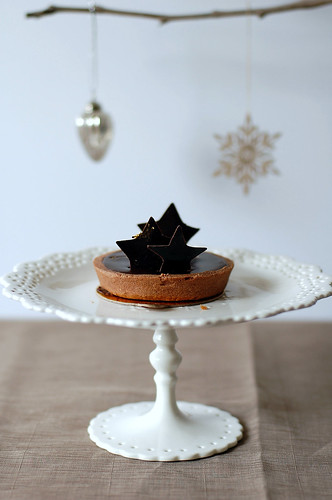
All glam up =]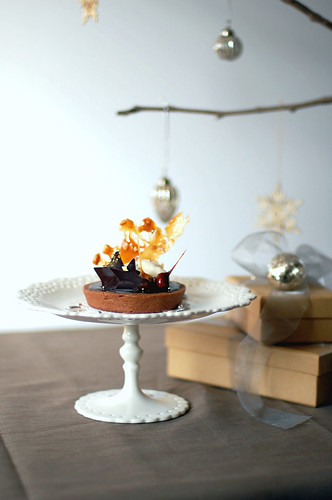
Tarte au chocolat et caramel
makes four 8cm/3-inch tarts
Sweet pastry crust
270g all purpose flour
100g unsalted butter, softened
80g caster sugar
2 eggs
40g Dutch-process cocoa powder
Caramel
275g caster sugar
110ml whipping cream
135g unsalted butter, coarsely chopped
1/3 cup water
1tsp fleur de sel
Chocolate truffle ganache filling
165g bittersweet chocolate (65 -70% cocoa solids), finely chopped
250ml whipping cream
20g unsalted butter, room temperature
25g caster sugar
25ml rum (Myers)
For the sweet pastry:
Sift together the flour and cocoa powder; set aside. Beat butter, sugar and a pinch of salt using an electric mixer until pale, add eggs and mix. Add cocoa flour, mix until just combined, then turn onto a lightly floured surface and form into a disc. Wrap in plastic wrap and refrigerate for 1 hour or until firm.
Preheat the oven to 360°F/180°C. Rollout the pastry as thinly as possible on a lightly floured pastry board. Use an 11cm/4-inch diameter round cookie cutter to stamp out 4 circles and line four 8cm/3-inch pastry rings. Refrigerate for 1 hour or until firm then trim off excess pastry.
Line each pastry ring with foil, then fill with pie weight/baking beans/uncooked rice. Bake blind for 15 minutes. Remove foil and pie weight, return the pan to the oven for 10 minutes longer. Remove from the oven and let cool.
For the caramel:
Combine sugar and water in a saucepan and stir over medium heat until sugar dissolves. Bring to a boil and cook for 8-10 minutes or until dark-amber in color then remove from heat. Carefully add cream, butter and fleur de sel (mixture will spit) and stir. Return to heat and cook for 3 minutes or until smooth, then spoon into pastry crusts and refrigerate for 1 hour or until set. Pour any left over caramel into an airtight container and store in the refrigerator.
For the ganache:
Place the finely chopped chocolate in a heatproof bowl then set aside. Combine cream and sugar and bring to a boil in a saucepan over medium heat. Remove from the heat and slowly pour the hot cream to the chopped chocolate, let sit for 2 minutes then use a rubber spatula and stir until smooth. Using a whisk, whisked until chocolate completely melted, add the butter and whisk to mix. Add the rum, and stir until incorporated. Pour ganache into the pastry crusts on top of the caramel and fill it to the top but not overflowing! Let refrigerate for 2-3 hours or until set. Remove from refrigerator 15 minutes before serving.
As for garnish:
Caramelized almond crisp
1 cup skinless almond, coarsely diced/toasted
2/3 cup sugar
Caramel-glazed hazelnut needles
10 pieces whole hazelnuts, skinless/toasted
Line a jelly roll pan with parchment paper, spread out the diced almond and whole hazelnuts and bake at 320°F/160°C for 10 minutes or until light golden. Remove from oven and let cool.
Line another jelly roll pan with parchment paper; set aside. Put the sugar in a heavy skillet, heat over low heat until sugar melts around the edges. Do not stir the sugar. Swirl the pan if necessary to prevent the melted sugar from burning. Brush the sides of the pan with water to remove sugar crystals. If the sugar in the center does not melt, stir briefly. When the sugar is completely melted and medium amber in color, remove from heat; this process can take 5-10 minutes. Meanwhile, poke each hazelnut with a toothpick and set aside.
Working at a fast pace; dip 1 hazelnut into the melted sugar, swirl it to completely coated then pull upward and let it drip to form needle. Carefully place it on lined sheet to set; repeat as many times as you need to. Move on to make almond crisp.
Stir in the almonds with a wooden spoon, toss, and separate the clusters. Return to low heat and stir to coat the nuts on all sides, meanwhile use the wooden to separate the clusters. Cook until the mixture starts to bubble (**Handle with care – extremely hot mixture**), then spoon onto the parchment lined sheet and make whatever design you fancy. Let cool completely before use.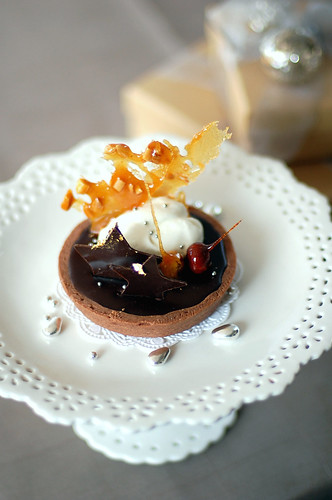
Star chocolate decoration
135g bittersweet chocolate, finely chopped
Chop the chocolate into tiny pieces and place in a dry heatproof mixing bowl. Temper the chocolate by melting it in the microwave. Need to do it on medium for 4~5 times and at 30 second interval. Stir the chocolate each time the microwave stops until becomes completely melted and smooth. Cool for 1 minute.
Spread the melted chocolate evenly with a spread knife on the back of a jelly pan. When the chocolate became set but not firm, stamp stars using varies size of star shaped cookie cutter then place jelly pan in refrigerator to chill and set. Carefully loosen chocolate stars with a small knife and poke it into tart.
How to dress up the tarts:
First, add a dollop of Chantilly cream onto the tart, poke 1 or 2 pieces of the caramelized almond crisp behind the cream, arrange hazelnut needles and a couple chocolate stars, and sprinkle some mini dragée all over the tart then add some edible gold!
最近買了很多書。書裡有很多我想在節日時做來過節及送人的甜點。最讓我心動的是京都風味Mont Blanc蛋糕及格雷伯爵茶慕斯杯﹐不過做法有夠複雜的而在時間不夠用的當下我只能對著書猛流口水。可能要等到新年放假的時候才能動手做了。
由於這個月常出差的關係﹐現在才有時間製造手工禮物送人。除了在家人朋友間很有口碑的酥脆美味的雪藏餅乾﹐還嘗試烤了日式芝麻餅乾﹑抹茶口味瑪德琳小蛋糕及為了一些特別要感謝的人跟12出生的你做的這個焦糖巧克力塔^^
第一次品嘗人生的第一個焦糖巧克力塔是在芝加哥的某個café﹐第一口咬下去是濃濃的巧克力香﹐跟著是充滿奶香的焦糖醬﹐再來是酥脆到不行的塔皮﹐滿滿的奶油香﹐吃的很滿足﹐特別是外面還下著雪的時候。回到家猛翻書找食譜﹐不過雖然很多書都有巧克力塔的做法﹐但都沒有加焦糖醬﹐只好自己改食譜試做﹐所幸味道還不錯。不記得那個大師說過鹽巴能提引出巧克力特有的濃醇香气﹐特地買来鹽之花做甜點﹐果然所言非虛! 那甘那許入口即化﹐口感很綿密濃醇﹐香醇久久不散。
我常強調食物除了要美味還要看起來賞心悅目﹐特別是送人的食物﹐所以就花了不少時間裝飾甜塔讓它更體面。當中的焦化榛果(針)自從在這裡出現後﹐很多人常来信問我如何製作所以特地附上做法。當加了食用銀珠及食用金箔點綴後變得華麗了﹐超適合作为holiday dinner的finale呢~
還有過幾天就是聖誕節﹐希望你們有個充滿歡笑的節日喔﹗Merry Christmas >3<
香濃焦糖巧克力塔 – 4個直徑 8cm/3寸 的塔
可可亞甜塔皮
270g 麵粉
100g 無鹽奶油 - 室溫放軟﹐切成小方塊
80g 細砂糖
2個 全蛋
40g 可可亞﹐Dutch-process
製作甜塔皮:
將麵粉﹑可可亞混合過篩後備用。將切成小方塊的奶油﹑細砂糖﹑1/4茶匙的鹽巴
用電動攪拌器攪打至奶油變淡黃色後加入雞蛋﹐攪拌勻﹐然後加入可可亞麵粉快速拌勻成糰塊。若是麵粉過乾﹐加入1湯匙冰水﹐如果看起來還是很乾再加1湯匙冰水至聚集成糰塊。將麵糰放在撒上麵粉的工作台上﹐揉至軟滑成球狀。輕壓成扁圓片﹐蓋上保鮮膜﹐放進冰箱靜置60分鐘醒麵。
烤箱預熱至360°F/180°C。取出麵糰﹐放在撒上麵粉的工作台上﹐將麵糰桿成約厚3mm的薄片後用直徑11cm/4寸的圓的餅乾模具吸出4個圓形薄片。鋪進塔派圈模裡﹐壓實塔皮底及塔皮壁﹐蓋上保鮮膜﹐放進冰箱冷藏60分鐘定型。
取出﹐用刀子將模型裡多出來的麵皮切掉﹐在每個塔皮鋪上烘焙用紙﹐加入烘焙石或乾豆至半滿﹐放入烤箱烤15分鐘。取去烘焙用紙及烘焙石﹐繼續烤10分鐘或至塔皮呈深巧克力色。取去﹐放涼。
焦糖醬
275g 細砂糖
110ml 鮮奶油
135g 無鹽奶油, 切丁
1/3杯 清水
1茶匙 fleur de sel 海鹽*
*Fleur de sel即鹽之花﹐沒有和泥土接觸﹐鹽之花顏色純白﹐是最負盛名的法國頂級海鹽。因为只有在特定產地、特定時間的鹽田才能結晶出鹽之花﹐数量少且只能以傳統手工採收﹐遂格外珍稀珍貴。最經典產地為法國布列塔尼的Guerande地區﹐所產的鹽之花鹹味圓潤輕柔、回甘悠長﹐散發著似有若無的紫羅蘭花氣息﹐令人著迷不已。
將細砂糖和水倒入小鍋裡﹐用中火加熱﹐不停的攪拌至細砂糖完全融化。煮沸後繼續煮﹐不時輕輕搖一下小鍋使糖漿不會煮焦﹐待煮至砂糖完全融化呈深琥珀色(過程約8 -10分鐘)﹐離火。慢慢地注入鮮奶油﹐其間不停的攪拌﹐然後加入奶油(會有分離的跡象)及fleur de sel 海鹽 ﹐攪拌勻。用小火繼續加熱煮3分鐘至奶琥珀色及滑順﹐離火。平均倒在事前做好的可可亞塔裡至4份1滿﹐趁熱將其攤平至均勻平整。稍微放涼﹐放進冰箱冷藏60分鐘凝固。將剩下的焦糖醬放入密閉的容器裡﹐再放冰箱存放。
苦甜巧克力甘那許夾心餡
165g 苦甜巧克力 (65 -70% 可可亞成份), 切碎
250ml 鮮奶油
20g 無鹽奶油 - 室溫放軟﹐切成小方塊
25g 細砂糖
25ml 蘭姆酒(Myers)
將巧克力切碎﹐倒進耐熱容器中備用。將鮮奶油和細砂糖混合倒進鍋子裡用中火加入煮沸﹐離火。將熱奶漿注入切碎的巧克力中﹐讓靜置2分鐘﹐然後用橡皮刀攪拌至順滑。改用打蛋器攪打至巧克力完全融化﹐加入奶油拌勻﹐最後加入蘭姆酒﹐等拌至全體出現光亮且黏稠滑順時即可。將甘那許倒滿塔皮﹐放入冰箱冷卻凝固2 – 3小時。食用前15分鐘取出放室溫會暖。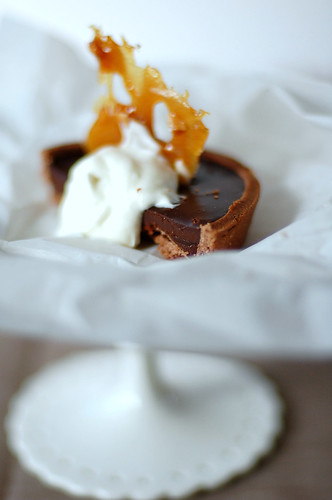
焦糖杏仁糖脆
1杯 培烘過的去皮杏仁粒
2/3杯 砂糖
焦化榛果針
10粒 培烘過的去皮榛果
在蛋糕卷專用模具或方形模具裡鋪上烤盤紙﹐再將杏仁粒及去皮榛果分開排放在上﹐用320°F/160°C烤10分鐘至金黃色﹐取出放涼備用。
在另一個蛋糕卷專用模具或方形模具上鋪上烤盤紙備用。榛果插入牙籤備用。將砂糖倒入小鍋裡﹐用小火加熱﹐不時輕輕搖一下小鍋使砂糖不會煮焦﹐但不要攪拌砂糖不然會晶化的。待煮至砂糖完全融化呈淺焦糖色﹐過程約5~10分鐘﹐離火。將榛果棒完全裹上糖漿再慢慢往上拉﹐讓糖漿往下滴就會形成糖針﹐放在烤盤紙上放涼定型。快速重複做完剩下的榛果棒後﹐再製作杏仁糖脆。
一鼓作氣加入杏仁粒﹐用木匙稍微攪拌﹐裹上糖漿﹐再用木匙將杏仁粒堆切開。用小火繼續加熱﹐不停的攪拌至糖漿完全包裹杏仁粒﹐糖漿起泡為止﹐離火。快速用湯匙舀出倒在事前準備好的模具上﹐趁熱畫出你的要的花樣﹐讓冷卻變成硬塊用作裝飾。
星星巧克力裝飾
135g 苦甜巧克力 (65 -70% 可可亞成份), 切碎
巧克力切碎後﹐放進一個耐熱的碗裡。碗一定要確實擦乾﹐不可有任何水份。放進microwave裡加熱。分4~5次﹐每一次間隔為30秒的加熱及調溫巧克力。每一次都要確實攪拌勻至完全融化的狀態﹐稍微放涼約一分鐘。
將蛋糕卷專用模具或方形模具翻轉﹐將巧克力倒在上面平均地攤抹開來﹐在常溫下凝固。待巧克力看上去是乾的但還沒有完全變硬的時候﹐用不同尺寸的星星餅乾模具吸印出星星圖形﹐然後將整個蛋糕卷專用模具放進冰箱冷卻定型。
組合及裝飾巧克力塔:
待甘那許完全凝固才可以裝飾。在巧克力塔上擠一些香堤麗鮮奶油﹐再擺放焦糖杏仁糖脆﹑2~3粒焦化榛果針﹑星星巧克力裝飾﹑最後是食用銀珠及食用金箔點綴。
Friday, December 19, 2008
Belated December Birthday treat: tarte au chocolat et caramel ~ 香濃焦糖巧克力塔
Subscribe to:
Post Comments (Atom)


整得好靓啊~~~D相影得好有圣诞气氛~~~~记得要补上中文食谱哦~~~
ReplyDelete很可爱的甜点,一定也很好吃.
ReplyDelete为什么VI一直坚持用DUTCH的COCOA呢?我也有DUTCH的,不过是凑巧买的.有什么讲究吗?
from katy2013
ARHHHHH!! 0古力星星好可愛喔!!!!
ReplyDeleteLove your cake stand, perfect for Xmas :)
oh. my. god. Amazing.
ReplyDeleteHow fancy! It looks beautiful!
ReplyDeleteLovely. Looks scrumptiously delicious!
ReplyDelete好想食呀 ~ I love chocolate ~
ReplyDelete請問呢個份量可以整幾多個呢 ?
嘩....愛c人啦!!!蛋糕同個stand都勁靚呀!!!!
ReplyDelete非常好吃! it looks so pretty & delicious! yummy!!! ;)
ReplyDeleteOh my!!! Another creation that's too beautiful to eat!! *_*
ReplyDeleteAnd that cake stand! I LOVE it~~~~
Merry Christmas to you~ Stay warm. =^_^=
So pretty! I would love to get something like this served to me at a dinner party or at a fancy restaurant. It is a little work of art.
ReplyDeleteYour pastry is always so pretty!!
ReplyDeleteWish you and your families a merry xmas and a happy new year!!
Dear Venus,
ReplyDeleteWishing you and your family a warm & Happy Christmas & New Year. All the best for YR 2009!
Mayu
好靚啊.....請問什麼是可可亞?
ReplyDeleteMerry Christmas!!!
ReplyDeleteAll I can say is WOW!
ReplyDeleteMerry Christmas!
我有emial比你,你check下有沒有收到呀!!!
ReplyDeleteso lovely and so desirable!
ReplyDeleteHi all!
ReplyDeleteThank you for your lovely comments! This tart tastes even better after 2 days so I hope you all will give this a try^^
Cheers~
謝謝大家的留言哦﹗好像頗多人喜歡這個cake stand呢^^
ReplyDelete阿皮 - 我想你一定會愛死呢個tart﹐因為好香好chocolaty! 可以整約4~5個直徑 8cm/3寸0既塔。
dar/Katy~
嗯﹐很好吃^^
我一直坚持用Dutch process cocoa是因為它比其他的cocoa富濃郁香醇的口感﹐做出來的巧克力甜點顏色也較深及漂亮喔~
Hi gianne,
多謝你呀~
可可亞即係可可粉/朱古力粉。
Hi Venus,
ReplyDelete從「桔香小蛋榚」開始看你的Blog,今天還是第一次給你留言。Happy New Year!
請問這可可甜撻皮可否做好後存放在Freezer內一,兩星期?THX!
我跟你的食譜做了一點, 但發現塔皮好像很硬, 感覺上面粉的分量好像多了一點, 不夠鬆脆, 希望你不要介意, 因為你做得實在太漂亮太專業了!! 自己卻做不到, 很想知道出了甚麼問題~
ReplyDeleteHi newnew~
ReplyDelete謝謝你你這麼捧場哦♥
可以的。可可甜撻皮包好放冷藏格存放可達一個月久。如果是烤好才存放就要在使用前放烤箱烤5分鐘讓口感恢復酥脆。
Hello shing chit~
ReplyDelete謝謝你的feedback。我不會介意的 =)
Hmmm…我的塔皮烤的很酥脆﹐就算放冰箱一週口感也沒變。塔皮會硬離不開1)烘烤溫度 2)奶油沒打發好 3)麵粉過多。請問你的烤箱是conventional(可調上下溫度)或是traditional的呢? 如果是前者﹐那么溫度需要調低一點因為Conventional烤箱比傳統烤箱溫度來的高。再者是奶油沒有打發好﹐塔皮吃起來就不會酥。奶油一定要放軟後打發成2倍以上的程度才行。最後就像你說的﹐麵粉過多和奶油不成比例。你嘗試將麵粉減去25g看看。希望以上其中一項會解決你的問題。
汲錯啊, 我的oven是上下火的, 所以我每次跟食譜的溫度和時間都會焦掉, 我都是調低10°C然後看顏色變金黃就拿出來, 但這次本來粉團已經像巧克力顏色看不清好了沒有, 可能因為這樣時間長了, 我會再試一次減去25g麵粉, 謝謝你, 你真的好nice~ (^^)
ReplyDeleteha ha ha... i was one of the lucky ones who got one from VENUS... it is the best of the BEST...HEART IT!!! = )
ReplyDeletecareer-girls-group~
ReplyDeleteHA...living near by has its benefits ;)
hi,Vi,我用你的方法烧焦糖,但是10分钟后颜色远不如你的那么深,该怎么办?谢谢
ReplyDeleteHello~
ReplyDeleteNo worry, 繼續加熱就可以了﹐但不建議將火開大喔~
very nice tart!!! the decorations look very complicated...i dun think i can ever make it so nice T_T
ReplyDeletei love your cake stand!!! do u mind sharing where you get it? ^^
895BC1BE4F
ReplyDeleteTakipçi Satın Al
İnstagram Abonelere Özel Görme Hilesi
Weplay Para Hilesi
Forza 5 Para Hilesi
Beğeni Hilesi
MMORPG Oyunlar
VP Satın Al
Ücretsiz Oyunlar
Film Önerileri