

This month's challenge is brought to us by the adventurous Hilda from Saffron and Blueberry and Marion from Il en Faut Peu Pour Etre Heureux. They have chosen a French Yule Log by Flore from Florilège Gourmand!
What is a French Yule Log? According to our hostesses, you can buy two kinds of Yule log in France, the Genoise or Buttercream type. However, what is more commonly purchased is a frozen Yule Log very reminiscent of an ice cream cake, only often it’s not made of ice cream but rather frozen mousse of some sort. In French this is called an entremets which is sometime loosely translated in English as simply as a cream dessert. This also means that this recipe is not holiday specific - it is just a scrumptious dessert recipe that you can enjoy year round!
The recipes of most elements come almost entirely from Florilège Gourmand, which belongs to Flore, except for one small labeled portion and some of the variations courtesy of our dear Daring Baker fairy Tartelette. Different recipes have been pulled from the entremet section of Flore’s site to make up this masterpiece. Also, since Flore’s blog is written in French, hugs to the hostesses for the translation! Thank you ladies for choosing this beautiful and absolutely scrumptious dessert!
Before we begin, I just want to let you know that this may look impossible to complete but I assure you that this looks 100 times harder than it really is! The key to success is organization! As long as you complete each element in the order that it calls for, you are half way there, what is left is how to assemble and to decorate. On top of this, I strongly advise you to break the elements into 2 days so you have enough time to draft up the final look of this dessert. You see, I bake the crème brûlée and make the chocolate praline crisp the night before and let them set in the refrigerator. Bake the dacquoise biscuit the next morning, while it is being cool, I whipped up the mousse. Assemble these elements and let set in the fridge. Meanwhile, make the ganache and complete the log composition. Later in the afternoon, demold and cover the log with glaze to complete it. Decorate it an hour before serving.
Now, enjoy the ooh and ahh from your friends and family, my dear^^
Here are the rules for the CHALLENGE - MUST MAKE ALL 6 of the following elements for the log:
1) dacquoise biscuit
2) mousse
3) ganache Insert
4) praline (Crisp) Insert
5) crème brûlée Insert
6) Icing/glaze
Some things to keep in mind:
- You are of course free to flavor your layers differently, we realize not everyone likes chocolate; it was just the simplest way to introduce variations. You will notice there are fruit variations in a couple of the components, you may of course do fruit flavoring for all of them, but we can’t guarantee we know exactly how to change the recipe in that case, so bear with us and we’ll try to help you out as much as possible.
- PLEASE READ THE NOTES AT THE BEGINNING OF EVERY SECTION. They should help you with most questions you may have, at least we hope.
- Please look at the pictures of the “new” components in this recipe that you may never have seen before and at a completed log courtesy of Marion running a test at the very end of the recipe.
- We’ve tried to give you as many measuring units as possible (this recipe started out in grams only). We hope this helps. Imperial units (tbsp etc…) are American.
- For all our alternative bakers, the recipe is so long we didn’t know where to start even asking Nathalie to do a gluten-free one, so please feel free to ask, we’ll do our best to help you.

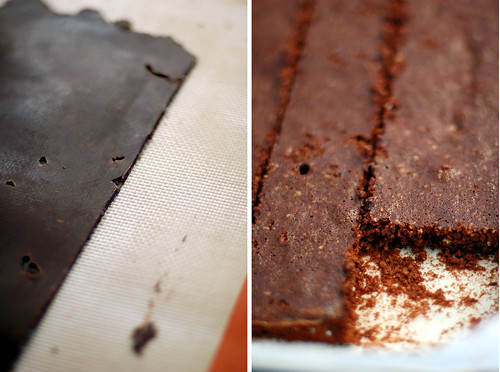
Element #1 ~ Praline Feuillete (Crisp) Insert
Note: Feuillete means layered (as in with leaves) so a Praline Feuillete is a Praline version of a delicate crisp. There are non-praline variations below. The crunch in this crisp comes from an ingredient which is called gavottes in French. Gavottes are lace-thin crepes. To our knowledge they are not available outside of France, so you have the option of making your own using the recipe below or you can simply substitute rice krispies or corn flakes or Special K for them. If you want to make your own praline, please click here.
Gavottes (lace crepes - recipe by Ferich Mounia) yields 60g
1/3cup (80ml) whole milk
2/3tbsp (8g) unsalted butter
1/3cup minus 2tsp (35g) all-purpose flour
1tbsp (15g) beaten egg
1tsp (3.5g) granulated sugar
½tsp vegetable oil
1. Heat the milk and butter together until butter is completely melted. Remove from the heat.
2. Sift flour into milk-butter mixture while beating, add egg and granulated sugar. Make sure there are no lumps.
3. Grease a baking sheet and spread batter thinly over it.
4. Bake at 430°F (220°C) for a few minutes until the crepe is golden and crispy. Let cool.
Chocolate Praline Feuillete:
100g bittersweet chocolate
1 + 2/3tbsp (25g) unsalted butter
2tbsp (30g) praline
60g gavottes or 2tbsp rice krispies or corn flakes
1. Melt the chocolate and butter in a double boiler.
2. Add the praline and the coarsely crushed lace crepes. Mix quickly to thoroughly coat with the chocolate.
3. Spread between two sheets of wax paper to a size slightly larger than your desired shape. Refrigerate until hard.
Element #2 ~ Jasmine-infused Crème Brulée Insert
Note: The crème brulée can be flavored differently by simply replacing the jasmine with something else e.g. cardamom, lavender, etc...
½ cup (115g) heavy cream
½ cup (115g) whole milk
4 med (72g) egg yolks
2tbsp (25g) granulated sugar
1tsp premium loose jasmine tea leave
1. Heat the milk, cream, and jasmine tea leave to just boiling. Remove from the heat and let the jasmine infuse for about 12 minutes.
2. Whisk together the sugar and egg yolks (but do not beat until white).
3. Pour the jasmine-infused milk over the sugar/yolk mixture and mix well.
4. Wipe with a very wet cloth and then cover your baking mold (whatever shape is going to fit on the inside your Yule log/cake) with parchment paper. Place it into a large roasting pan then pour hot water into the roasting pan all the way up half way of the baking mold. Pour the cream into the mold and bake at 210°F (100°C) for about 1 ½ hour or until firm on the edges and slightly wobbly in the center.5. Let cool and put in the freezer for at least 1 hour to firm up and facilitate the final assembly.
Tartelette says: You can bake it without a water bath since it is going to go inside the log (the aesthetics of it won't matter as much since it will be covered with other things)....BUT I would recommend a water bath for the following reasons:
- you will get a much nicer mouth feel when it is done
- you will be able to control its baking point and desired consistency much better
- it bakes for such a long time that I fear it will get overdone without a water bath
Now...since it is baked in a pan and it is sometimes difficult to find another large pan to set it in for a water bath, even a small amount of water in your water bath will help the heat be distributed evenly in the baking process. Even as little as 1 inch will help.
Element #3 ~ Dacquoise Biscuit (Almond Cake)
Note: You can use the Dacquoise for the bottom of your Yule Log only, or as bottom and top layers, or if using a Yule log mold (half-pipe) to line your entire mold with the biscuit. Take care to spread the Dacquoise accordingly. Try to bake the Dacquoise the same day you assemble the log to keep it as moist as possible.
¾ cup + 1Tbsp (80g) almond meal
½ cup (50g) confectioner’s sugar
2tbsp all-purpose flour
3tbps unsweetened cocoa powder, sifted
100g about 3 med egg whites
4tbsp (50g) granulated sugar
1. In a mixer, pulse the together the almond meal and the confectioner's sugar for no longer than 30 seconds then sift in the unsweetened cocoa powder. Finely mix all ingredients until incorporated.
2. Sift the flour into the mix.
3. Beat the eggs whites, gradually adding the granulated sugar until stiff.
4. Pour the almond meal mixture into the egg whites and blend delicately with a spatula.
5. Grease a piece of parchment paper and line your baking pan with it.
6. Spread the batter on a piece of parchment paper to an area slightly larger than your desired shape (circle, long strip etc...) and to a height of 1/3 inches (8mm).
7. Bake at 350°F (180°C) for approximately 15 minutes (depends on your oven), until golden. 8. Let cool and cut to the desired shape.
Element #4 ~ Bittersweet Chocolate Mousse
Note: You will see that a Pate a Bombe is mentioned in this recipe. A Pate a Bombe is a term used for egg yolks beaten with sugar syrup then aerated. It is the base used for many mousse and buttercream recipes. It makes mousses and buttercreams more stable, particularly if they are to be frozen, so that they do not melt as quickly or collapse under the weight of heavier items such as the crème brulee insert. In the Vanilla Mousse variation, pastry cream is made to the same effect. In the Mango Mousse variation, Italian meringue is made to the same effect. Italian meringue is a simple syrup added to egg whites as they are beaten until stiff. It has the same consistency as Swiss meringue (thick and glossy) which we have used before in challenge recipes as a base for buttercream. The whipped Cream option contains no gelatin, so beware of how fast it may melt.
Gelatin/Gelatine is the gelifying agent in all of the following recipes, but if you would like to use agar-agar, here are the equivalencies:
8g powdered gelatin = 1 (0.25 oz) envelope powdered gelatin = 1 Tbsp powdered gelatin = 1 Tbsp Agar-Agar. 1 Tbsp. of agar-agar flakes is equal to 1 tsp. of agar-agar powder.
2.5 sheets gelatin or 5g powdered gelatin
3 tbsp (40g) granulated sugar
1 ½ tsp (10g) glucose or thick corn syrup
1tbsp (15g) water
50g (3 med.) egg yolks
175g bittersweet chocolate, coarsely chopped
1.5 cups (350g) heavy cream
1. Soften the gelatin in cold water. (If using powdered gelatin, follow the directions on the package.)
2. Make a Pate a Bombe: beat the egg yolks until very light in color (approximately 5 minutes until almost white).
3. Cook the sugar, glucose syrup and water on medium heat for approximately 3 minutes (if you have a candy thermometer, the mixture should reach 244°F (118°C). If you do not have a candy thermometer, test the sugar temperature by dipping the tip of a knife into the syrup then into a bowl of ice water, if it forms a soft ball in the water then you have reached the correct temperature.4. Add the sugar syrup to the beaten yolks carefully by pouring it into the mixture in a thin stream while continuing to beat the yolks. You can do this by hand but it’s easier to do this with an electric mixer. Continue beating until cool (approximately 5 minutes). The batter should become thick and foamy.3. In a double boiler or equivalent, heat 2 tablespoons of cream to boiling then add the chopped chocolate and stir until melted and smooth.
4. Whip the remainder of the cream until stiff.
5. Pour the melted chocolate over the softened gelatin, mixing well. Let the gelatin and chocolate cool slightly and then stir in ½ cup of WHIPPED cream to temper then add the Pate a Bombe.
6. Add in the rest of the WHIPPED cream mixing gently with a spatula until incorporated.
Element #5 ~ Jasmine-infused Dark Chocolate Ganache Insert
Note: Because the ganache hardens as it cools, you should make it right before you intend to use it to facilitate piping it onto the log during assembly. Please be careful when caramelizing the sugar and then adding the cream. It may splatter and boil.
4tbsp (50g) granulated sugar
1tsp premium loose jasmine tea leave
135g dark chocolate, finely chopped
3tbsp + ½ tsp (45g) unsalted butter softened
2/3 cup minus 1tbsp (135g) heavy cream
1. Add the jasmine tea leave to the heavy cream and let steep in the fridge overnight. Strain before use. 2. Make a caramel: Using the dry method, melt the sugar by spreading it in an even layer in a small saucepan with high sides. Heat over medium-high heat, watching it carefully as the sugar begins to melt. Never stir the mixture. As the sugar starts to melt, swirl the pan occasionally to allow the sugar to melt evenly. Cook to dark amber color (for most of you that means darker than last month’s challenge).
2. While the sugar is melting, heat the jasmine infused cream until boiling. Pour cream into the caramel and stir thoroughly. Be very careful as it may splatter and boil.
3. Pour the hot caramel-milk mixture over the dark chocolate. Wait 30 seconds and stir until smooth.
4. Add the softened butter and whip hard and fast (if you have a plunging mixer use it). The chocolate should be smooth and shiny.
Element #6 ~ Dark Chocolate Glaze/Icing
Note: Because the icing gelifies quickly, you should make it at the last minute.For other gelatin equivalencies or gelatin to agar-agar equivalencies, look at the notes for the mousse component.
½ tbsp powdered gelatin or 2 sheets gelatin
¼ cup (60g) heavy cream
5tbsp (60g) granulated sugar
¼ cup (50g) water
1/3 cup (30g) unsweetened cocoa powder
1. Soften the gelatin in cold water for 15 minutes.
2. Boil the rest of the ingredients and cook an additional 3 minutes after boiling.
3. Add gelatin to the chocolate mixture. Mix well.
4. Let cool while checking the texture regularly. As soon as the mixture is smooth and coats a spoon well (it is starting to gelify), use immediately.
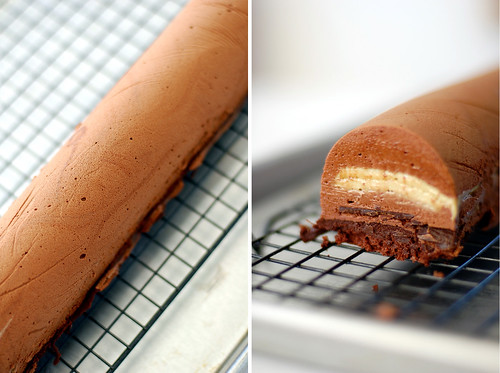
How to assemble your French Yule Log:
Depending on whether your mold is going to hold the assembly upside down until you unmold it or right side up, this order will be different.
THIS IS FOR UNMOLDING FROM UPSIDE DOWN TO RIGHT SIDE UP. You will want to tap your mold gently on the countertop after each time you pipe mousse in to get rid of any air bubbles.1. Line your mold or pan, whatever its shape, with rhodoid (clear hard plastic, I usually use transparencies cut to the desired shape, it’s easier to find than cellulose acetate which is what rhodoid translates to in English) OR plastic film. Rhodoid will give you a smoother shape but you may have a hard time using it depending on the kind of mold you’re using.
You have two choices for Step 2, you can either have Dacquoise on the top and bottom of your log as in version A or you can have Dacquoise simply on the bottom of your log as in version B:
2. Cut the Dacquoise into a shape fitting your mold and set it in there. If you are using an actual Yule mold which is in the shape of a half-pipe, you want the Dacquoise to cover the entire half-pipe portion of the mold.
3. Pipe one third of the Mousse component on the Dacquoise.
4. Take the crème brulee insert out of the freezer at the last minute and set on top of the mousse. Press down gently to slightly ensconce it in the mousse.
5. Pipe second third of the Mousse component around and on top of the crème brulee Insert.
6. Cut the Praline/Crisp Insert to a size slightly smaller than your mold so that it can be surrounded by mousse. Lay it on top of the mousse you just piped into the mold.
7. Pipe the last third of the Mousse component on top of the Praline Insert.
8. Freeze for a few hours to set. Take out of the freezer.
9. Pipe the Ganache Insert onto the frozen mousse leaving a slight edge so that ganache doesn’t seep out when you set the Dacquoise on top.
10. Close with the last strip of Dacquoise.
Freeze until the next day.
OR
1. Pipe one third of the Mousse component into the mold.
2. Take the crème brulee insert out of the freezer at the last minute and set on top of the mousse. Press down gently to slightly ensconce it in the mousse.
3. Pipe second third of the Mousse component around and on top of the crème brulee insert.
4. Cut the Praline/Crisp Insert to a size slightly smaller than your mold so that it can be surrounded by mousse. Lay it on top of the mousse you just piped into the mold.
5. Pipe the last third of the Mousse component on top of the Praline Insert.
6. Freeze for a few hours to set. Take out of the freezer.
7. Pipe the Ganache Insert onto the frozen mousse leaving a slight edge so that ganache doesn’t seep out when you set the Dacquoise on top.
8. Close with the Dacquoise.
Freeze until the next day.
If you are doing the assembly UPSIDE DOWN with TWO pieces of Dacquoise the order is:
1) Dacquoise
2) Mousse
3) Crème Brulee Insert
4) Mousse
5) Praline/Crisp Insert
6) Mousse
7) Ganache Insert
8) Dacquoise
If you are doing the assembly UPSIDE DOWN with ONE piece of Dacquoise on the BOTTOM ONLY the order is:
1) Mousse
2) Crème Brulee Insert
3) Mousse
4) Praline/Crisp Insert
5) Mousse
6) Ganache Insert
7) Dacquoise
If you are doing the assembly RIGHT SIDE UP in a springform pan the order is:
1) Dacquoise
2) Ganache Insert
3) Mousse
4) Praline/Crisp Insert
5) Mousse
6) Crème Brulee Insert
7) Mousse
8 OPTIONAL) Dacquoise
THE NEXT DAY...
1. Unmold the cake/log/whatever and set on a wire rack over a shallow pan.
2. Cover the cake with the icing.
3. Let set. Return to the freezer.
4. You may decorate your cake however you wish. The decorations can be set in the icing after it sets but before you return the cake to the freezer or you may attach them on top using extra ganache or leftover mousse, etc...
5. Transfer to the refrigerator no longer than ½ hour before serving as it may start to melt quickly depending on the elements you chose.
就以巧克力為2008年完美的落幕吧﹗
這巧克力樹幹慕斯是Daring Bakers12月的指定挑戰品。蛋糕的食譜由自名為Florilège Gourmand的網站~
用上6種濃厚風味口感的甜點素材組合而成﹐步驟複雜但卻不會讓人感到構成的材料很多﹐是人人也可在家製作的一道甜點。對於口感的重視﹐是法國甜點獨一無二的特徵﹐雖然這蛋糕混合了多種巧克力﹐可又很奇妙的在舌頭上融合﹐使甘美的香氣合而為一。
#1 ~ 巧克力千層酥 - 直徑9x13in/23x34cm長方形烤模1個
3.5安士 (100g) 苦甜巧克力﹐切碎
1 + 2/3湯匙 (25g) 無鹽奶油
2湯匙 (30g) 榛果糖膏
60g法式薄餅or 2湯匙玉米片
蛋糕卷專用烤盤或長方形模具上鋪上烤盤紙﹐備用。將切碎的巧克力和無鹽奶油放進一個耐熱的碗裡﹐隔水加熱融化。用橡皮刀不停地攪拌至完全混合融化後﹐倒入榛果糖膏及玉米片快速攪拌勻。將巧克力糊倒在鋪了烤盤紙的模具中﹐推勻﹐再鋪上另一張烤盤紙輕壓鋪平。放進冰箱冷藏至定形成硬塊備用。
#2 ~茉莉口味烤布蕾 - 直徑8in或18 X18cm方形烤模1個
布蕾(又名烤布丁)可以做成很多不同的口味像香草﹑薰衣草﹑荳蔻﹑巧克力等等。
½ 杯 (115g) 鮮奶油
½ 杯 (115g) 全脂奶
4 個M尺寸(72g) 蛋黃
2湯匙 (25g) 砂糖
1茶匙 茉莉茶葉
將奶﹑鮮奶油及茉莉茶葉混合倒進小鍋裡﹐用中火慢慢加熱﹐ 煮至沸騰時立刻熄火﹐蓋上鍋蓋泡10 – 15分鐘。
預熱烤箱至210°F/100°C。將蛋黃和砂糖混合充份攪拌勻後 (不要攪拌至變淡白)﹐慢慢注入過濾後的茉莉熱奶漿﹐邊倒邊攪拌﹐攪拌至蛋奶漿變稠均勻後在奶漿上方鋪上一片餐巾紙﹐輕輕地吸取掉泡沫後倒進模具中。將模具放進有深度的烤盤裡﹐然後注入熱開水達模具一半的高度﹐再放進預熱過的烤箱裡烘烤90分鐘 (60分鐘後要不停的查看以免烤焦)。當搖晃模具時布蕾中央會抖動但週邊不動即烤好了。取出﹐待室溫放涼﹐蓋上保鮮膜﹐放冰箱冷卻一個小時或一個晚上。
#3 ~巧克力杏仁蛋白蛋糕(Dacquoise) - 直徑9x13in/23x34cm長方形烤模1個
令人心醉的香醇濃郁風味﹐香氣四溢﹐品嚐起來是紮實的堅果口感。保溼性佳,就算等上一段時間才享用,也不失其溼潤口感。
¾ 杯+ 1湯匙 (80g) 杏仁粉
½ 杯 (50g) 糖粉
2湯匙 麵粉
3湯匙 無糖可可粉﹐篩過
100g (約3個M尺碼) 蛋白
4湯匙 (50g) 砂糖
事前準備:
- 將一烤架移到烤箱下格﹐烤箱預熱至350°F/180°C。
- 蛋糕卷專用烤盤或長方形模具上鋪上烤盤紙﹐備用。
將杏仁粉﹑糖粉用食物處理器攪打30秒﹐篩入可可粉﹐攪打至混合﹐再篩入麵粉﹐拌勻備用。
另一mixing bowl裡加進蛋白﹐用電動攪拌器以中速攪打蛋白﹐小量地加進砂糖﹐攪打至富含空氣且顏色變白出現尖角程度為止﹐約3分鐘。小量地將杏仁粉加進蛋霜中﹐用橡皮刀輕輕的源邊往下刮翻切拌勻。
將麵糊倒進模具中﹐將麵糊推勻﹐輕輕敲一下烤模釋放氣泡後﹐放進預熱過的烤模裡﹐以350°F/180°C烘烤約15分鐘。等烤到週圍會因烤熟而稍稍縮小﹐烤模和蛋糕體間就會出現空隙﹐輕按蛋糕中間時感覺到彈性即烤好。也可以用竹籤插入中央﹐慢慢拔出時不會沾黏﹐就烤好了。從烤箱取出﹐擺在網架上放涼5分鐘﹐然後翻轉倒扣脫模﹐整個放涼後切割成長方形狀(比模具稍微小一點)。
如果不立刻使用﹐可將蛋糕包好放冰箱存放﹐可以保存3天。如果放冰格冷藏可以存放1個月。使用前靜置回溫即可。
#4 ~ 黑巧克力慕斯
pâte à bombe指的是將熱的糖漿加入蛋黃中充份打發至富含空氣的蛋漿糊。是很多奶油餡及慕斯甜點的基底﹐可讓其更固定﹐成托力更好及不易融化。
3 湯匙 (40g) 砂糖
1½ 茶匙 (10g) 玉米糖漿或純葡萄糖
1湯匙 (15g) 清水
50g (約3個) 蛋黃
175g 苦甜巧克力﹐切碎
1杯半(350g) 鮮奶油
2.5片魚膠片或5g 魚膠粉
事前準備:
- 明膠片用冰水泡軟之後擠掉水分﹐備用。如果用明膠粉: 將明膠粉倒入水裡 (2大匙) 泡脹後備用。
製作pâte à bombe:
Mixing bowl裡加進蛋黃﹐用電動攪拌器以中速打發至顏色變淡白﹐約5分鐘。打發蛋黃的同時﹐邊將砂糖﹑玉米糖漿﹑及清水混合倒進鍋子裡用中火加熱。約煮3分鐘至溫度為244°F /118°C為止。如果沒有糖果溫度計﹐舀取1小匙糖漿滴到冷水中﹐取出在手指間 搓揉﹐若能成為小球狀的濃度即可﹐離火。
用電動攪拌器以低速繼續打發蛋黃﹐邊將糖漿細絲般的慢慢地注入蛋漿中(千萬不要攪拌糖漿會結晶的),完全注入糖漿後轉中速繼續打發﹐打至冷卻富含空氣變結實的程度﹐約5分鐘﹐備用。
製作慕斯:
將2湯匙的鮮奶油以中火煮沸﹐離火。加入切碎的苦甜巧克力﹐讓靜置2分鐘﹐然後用橡皮刀攪拌至順滑﹐紋理細緻且有光澤為止﹐稍微放涼。巧克力漿放涼的同時﹐用電動打蛋器打發剩餘的鮮奶油至變富含空氣出現尖角的程度。將泡軟的明膠片拌進還是流動狀態的巧克力漿裡﹐攪拌勻。拌入約3份1打發好的鮮奶油﹐拌勻後倒進pâte à bombe﹐用橡皮刀輕輕的源邊往下刮翻切拌勻。最後拌入剩下打發好的鮮奶油﹐用橡皮刀輕輕的源邊往下刮翻切拌勻。
#5 ~ 茉莉口味苦甜巧克力甘那許夾心 -1½ 杯份量
4湯匙 (50g) 砂糖
1茶匙 茉莉茶葉
135g 苦甜巧克力 (65 -70% 可可亞成份), 切碎
3湯匙 + ½ 茶匙 (45g) 無鹽奶油 - 室溫放軟﹐切成小方塊
135g 或2/3杯減1湯匙的 鮮奶油
鮮奶油與茶葉混合,放進冰箱,泡浸一個晚上。
將砂糖倒入小鍋裡﹐用中火加熱。不要攪拌砂糖但要不時的輕輕搖幾下﹐讓它不會煮焦。同時用別個鍋子將過濾後的茉莉鮮奶油以中火煮沸﹐離火。待砂糖完全融化證琥珀色時﹐將茉莉鮮奶油一鼓作氣倒進糖漿中﹐這時奶漿可能會四處飛濺﹐不要給燙到喔﹗這個時候糖漿會結晶﹐搖幾下鍋子﹐繼續煮2分鐘就會溶化﹐離火。
將焦糖漿慢慢地注入切碎的苦甜巧克力中﹐讓靜置2分鐘﹐然後用橡皮刀攪拌至順滑﹐加入奶油拌勻。改用打蛋器攪打至巧克力完全融化﹐全體出現光亮且黏稠滑順時即可。然後將甘那許倒進擠花袋裡備用。
#6 ~ 巧克力鏡面 – 1 ½ 杯份量
鏡面很容易凝固﹐所以最好在裝飾前製作。
¼杯 (60g) 鮮奶油
5湯匙 (60g) 砂糖
¼杯 (50g) 清水
1/3杯 (30g) 無糖可可粉
2片魚膠片或½ 湯匙魚膠粉
事前準備:
- 明膠片用冰水泡軟之後擠掉水分,備用。如果用明膠粉: 將明膠粉倒入水裡 (2大匙) 泡脹後備用。
將鮮奶油﹑砂糖﹑清水及無糖可可粉混合倒入小鍋裡﹐用中火加熱﹐不時攪拌讓液體不會煮焦﹐煮沸後繼續煮3分鐘。加入泡軟的明膠片﹐用橡皮刀攪拌均勻至順滑看不見碎粒即可﹐稍微放涼。待可可漿變稠﹐並可以在湯匙背劃出清晰的線條時就可使用。
螺旋狀巧克力裝飾
135g 苦甜巧克力﹐切碎
巧克力切碎後﹐放進一個耐熱的碗裡。碗一定要確實擦乾﹐不可有任何水份。放進microwave裡加熱。分4~5次﹐每一次間隔為30秒的加熱及調溫巧克力。每一次都要確實攪拌勻至完全融化的狀態﹐稍微放涼約一分鐘。
將蛋糕卷專用模具或方形模具倒轉﹐鋪上矽膠條(2.5x14in/6x40cm)。用抹刀的前端沾取少量的調溫後的巧克力﹐塗抹在矽膠片上﹐用鋸齒梳子劃出線條圖案﹐在常溫下凝固。待巧克力看上去是乾的但還沒有完全變硬的時候﹐將矽膠條捲成圓形螺旋狀﹐然後放置在半圓形模具中﹐在常溫下凝固定形後﹐再放進冰箱定形。
水滴狀巧克力裝飾
將蛋糕卷專用模具或方形模具倒轉﹐鋪上矽膠條/片。用抹刀的前端沾取少量的調溫後的巧克力﹐邊按壓在矽膠條/片上邊用手向前拉﹐形成水滴圖案﹐在常溫下凝固定形後﹐再放進冰箱定形。
組合及裝飾蛋糕:
事前準備:
- 在一個40X8cm的長半圓形模具鋪上一層保鮮膜(四邊留約2in/6cm的尾巴)﹐按壓出氣泡讓保鮮膜貼服﹐備用。
- 將巧克力千層酥切成約2.5in/6cm片狀的長方形條﹐備用。
- 將烤布蕾切割成2.5in/6cm片狀的長方形條﹐備用。
- 將蛋糕體切成4片比長半圓形模具小一點的長方形條﹐備用。
將黑巧克力慕斯倒進模具中至5分滿﹐推勻並薄薄地鋪平至模具邊緣﹐輕輕敲一下模具釋放氣泡。將烤布蕾條填入巧克力慕斯中﹐鋪上巧克力千層酥片﹐再一層薄薄的巧克力慕斯﹐推平﹐擠一層巧克力甘那許夾心在上﹐再鋪上薄薄的巧克力慕斯﹐推平﹐最後鋪上蛋糕條﹐往下輕按﹐將蛋糕放入冰箱冷卻定形3小時或一個晚上。
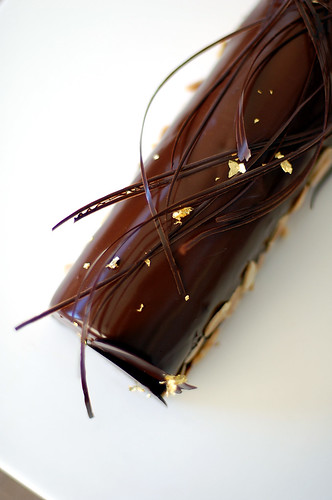
取出蛋糕﹐兩手拉著保鮮膜往上提﹐待蛋糕體可以拉離模具時翻轉倒扣脫模。切去表面四週的蛋糕體﹔製作巧克力鏡面。
將蛋糕連網架擺放在深的烤盤上。將微溫的鏡面淋在蛋糕上﹐任鏡面溢滿源周邊流下包覆整個蛋糕(連烤盤一起提起輕敲一下會幫助甘那許源邊流下)。記住這時動作要迅速,因為溫度容易下降﹐鏡面很快就會凝固。讓蛋糕靜置凝固15分鐘才可以裝飾蛋糕。
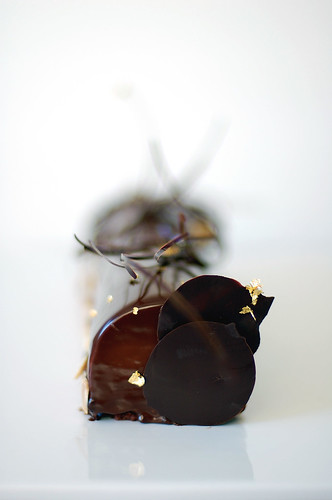
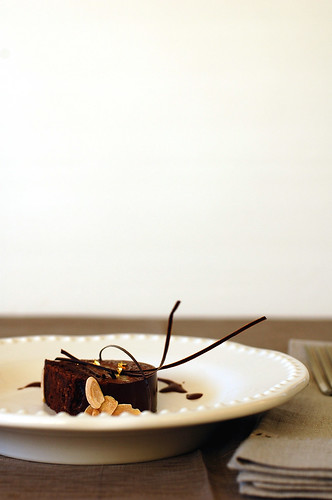
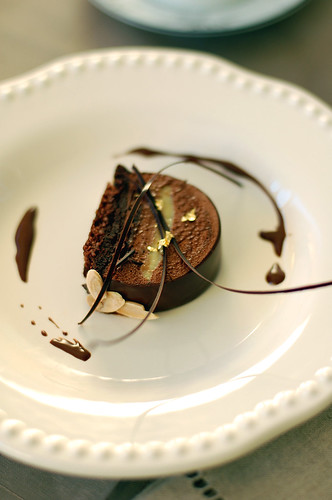
在蛋糕表面撒一些食用金箔粉﹐然後貼一些烤杏仁片在蛋糕側面﹐隨意擺放巧克力旋渦條﹐再在蛋糕前後方黏幾片裝飾巧克力片﹐最後加點食用金箔點綴即可。將蛋糕放進冰箱冷藏30分鐘固定。


absolutely gorgeous!
ReplyDeletewish it's right in front of me now.
WOW, mine doesn't look anything CLOSE, like heaven and earth diffreent.....
ReplyDeleteJealous!!!
My God woman! I am an okay baker but you are a Goddess! The pictures are equally amazing. How long did that take you? I bow before you. Thanks for sharing!
ReplyDeleteDana Zia
http://danazia.wordpress.com/
oh this is so beautiful, it looks delicious
ReplyDeleteI'm just struck by the beauty of your log. Its gorgeous. How did you do those chocolate strands?
ReplyDeleteBest wishes for a Happy New Year.
Mon dieu, voilà des images superbe ! Je suis sans voix ! Vos photos sont...waouw, parfaite c'est le mot, c'est agréable de les regarder et de voir tant de talent ! Vous êtes photographe ? Vos photos sont plus jolies que dans un livre.
ReplyDeleteLa bûche est somptueuse, parfaite ! J'ai vu beaucoup de challenge, mais le vôtre est peut être le plus spectaculaire !
C'est la class, même "Le Nôtre" peut aller se rhabiller (ce qui est pas facile car c'est un pâtissier hors paire), mais votre boulot est digne des grand de ce monde !
Bonne fin d'année à vous et bonne future année !
Merci de me donner un tel spectacle de grand matin :)
It's simply gorgeous V and the pictures are absolutely stunning. I'm so pleased we gave you something that was up to snuff for you since you are such a talented baker, just let me know if you need a translation of anything else from French to English ;) I hope you have a lovely New Year!
ReplyDeleteAn extremely pretty log! Beautiful and perfect! Your pictures are stunning too!
ReplyDeleteCheers,
Rosa
This looks so delicious! Your decorating looks really beautiful and professional. The flavors sound amazing! Yum.
ReplyDeleteVery beautiful styling. It looks... perfect!
ReplyDeleteWhat a sophisticated looking yule log! Love it!
ReplyDeleteare you sure you are not a pastry chef?
ReplyDeletemy god this is icredible...........good job!
Just beautiful! I am so behind, due to much traveling, that I still have to post mine, which I hope to do in the next day or so.
ReplyDeleteYour pictures are stunning, and I love the idea of the jasmine infused flavor.
ReplyDeleteEverything I said on your Flickr stream plus "it's gorgeous"... :)
ReplyDeleteHappy New Year!
Dear Vi,
ReplyDeleteThis is breath-taking as ever!
Happy New Year!
nice log , the gold leaf look pretty on your log, and your kitchen is load of professinonals untesils i think , haha! and happy new year to you ya ;-p
ReplyDeleteIt looks and sounds so beautiful!
ReplyDeletegorgeous! You have a lovely blog!
ReplyDelete嘩....上面的朱古力淋面做得好靚呀!!!
ReplyDelete這款好高貴呀!!!
wow: just perfect!
ReplyDeleteGgorgeous! Love the chocolate strand decorations.
ReplyDeleteThank you everyone for your kind comments! Best wishes to all in 2009!
ReplyDeletekisses >♥<
Aparna - Believe or not, the chocolate strands were the easiest to make! Just temper the chocolate, spread it on a stripe of acetate then draw line using a comb!
Hello yy ~
ReplyDelete今次個glaze效果真的不錯﹐可能係temper巧克力的時間計算準確0左^^
你都試下整呢個蛋糕啦。真係好得﹗
Hi veganpower,
ReplyDeleteNon, je ne suis pas photographe^^ Je suis touchée, merci pour ton commentaire! J'espère que vous testerez cette recette =)
Bonne journée~
I think this is the most beautiful one I have seen...and I have seen a lot of them!
ReplyDeleteCongratulations, that is an extremely beautiful log!
ReplyDeleteHi venus,
ReplyDeleteJ'ai également réalisé la recette en version vegan.
Vous n'êtes pas photographe ? Mais alors, d'où vient ce talent ? C'est fabuleux, j'en suis encore bouché B tellement cette buche est à tomber, c'est de l'art, mon dieu, j'aimerais avoir un talent pareil...
Pfiouh c'est à devenir jalouse !
Bravo car j'aime regarder de jolies choses et mes yeux en raffolent :)
Bonne année :)
the strend is 1 of my fav to use , thats what people say, SIMPLE AND NICE.
ReplyDelete仲靓过饼店卖个D啊~~~可唔可以打埋中文食谱出来啊?
ReplyDeleteYour Yule Log is absolutely exquisite!
ReplyDeletemagnifiques ces photos!!!!!!!!!!!!!!!!!!
ReplyDeleteStunning! I am so glad that you were within 5 blogs either side of mine on the list this month, otherwise I might not have discovered your beautiful blog.
ReplyDeletegreat post!!1
ReplyDeleteshall find time for this = )
Suzie
Bravissimo!!
ReplyDeleteUne oeuvre d'art pour les yeux et les papilles!!
Sonya :)
有emial給你,你看了未呀!!!口金扣我同你拿主意先訂.
ReplyDeleteThanks so much for all your kind notes!
ReplyDeletebreadpitt – simple and nice indeed =)
乜系你啊 – 謝謝你呀﹗久等了﹐中文食譜補上了^^
Eileen – thank you!
Omami – merci =)
Bria – thank you! At the rate that DB is growing, it is hard to keep up with everyone!
Suzie – you’ll love this! Please share your beautiful log when you’re done^^
Sonya - merci beaucoup pour ton commentaire~
Absolutely gorgeous log! And breathtaking photos!
ReplyDeleteVery Happy New Year, Vi!
it looks wonderful! ;)
ReplyDeleteHappy new year, sweetie!!
ReplyDeleteGorgeous photo, gorgeous cake! You are such a professional XD
你這個蛋糕真的做得非常精美!想請問你在那裏買這個U-shape Yule Log Mole? 謝謝!
ReplyDeleteI mean mold not mole.>_<
DeleteFrom sur la table :)
DeletePlease may you tell us the dimensions of your yule log mould? Thank you :)
ReplyDeleteThe mold is about 13 3/4""L x 2 3/8""W x 1 3/4""H and about 3 cups capacity.
DeletePrediksi sdy
ReplyDeletePrediksi hk
live draw sgp tercepat
live draw hk
live draw sdy
Live result taiwan tercepat