

The February 2009 challenge is hosted by Wendy of WMPE's blog and Dharm of Dad ~ Baker & Chef. We have chosen a Chocolate Valentino cake by Chef Wan; a Vanilla Ice Cream recipe from Dharm and a Vanilla Ice Cream recipe from Wendy as the challenge.
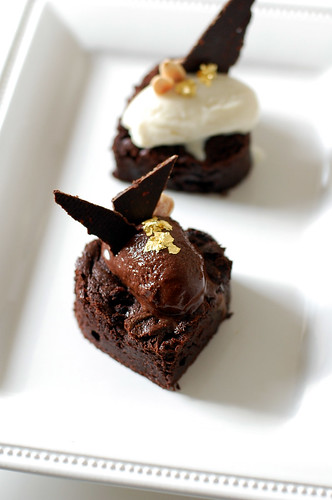
Chocolate Valentino is a flourless chocolate cake adopted from Sweet Treats by Malaysia’s “most flamboyant food ambassador”, Chef Wan. The recipe consists of 3 simple ingredients, chocolate (your choice), butter, and eggs. The simplicity of this recipe gives credit to the ingredients much in the same way of French baguette. It comes together very quickly too. However, the end result is a rich, luxurious and moist cake that would have you asking for a 2nd, maybe 3rd serving!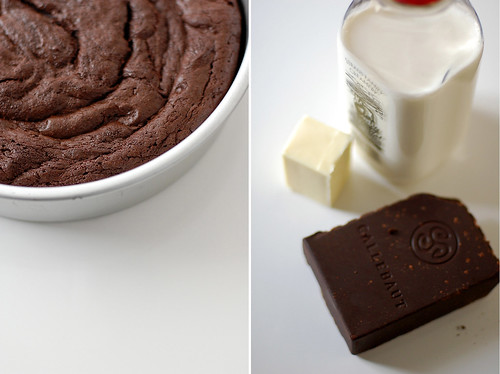
Our hosts have provided recipes for vanilla ice cream but I opted to try something different. I chose to serve the cake with 2 flavors of sorbet, chocolate and Acacia honey. I recently was giving a book written by the founders of Scharffen Berger and there is this wonderful but seemingly simple recipe for chocolate sorbet that I have wanted to give a try. It was indeed simple to make and has such a deep and clear flavor. This chocolate on chocolate combo answers the call to all the die hard chocoholics =)
I am in love with Acacia honey since I used it to make this lovely cake. I love its subtle floral note and thought that it would make a lovely and delicious flavoring for a sorbet. It was light, delicate and has a distinctive honey aroma. This flavor combo is for those that are looking for a balance from the dense texture of the chocolate cake.
Thank you Wendy and Dharm for this wonderful recipe! Click here to check out my fellow DBrs' version of the cake!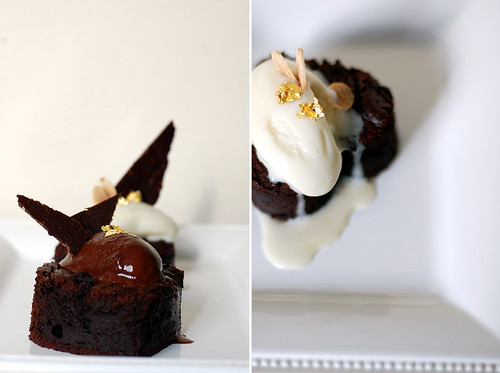

The rules as per our hosts:
- Use the provided cake recipe.
- The original recipe calls for the cake to be served with whipping cream BUT we decided to make this more of a challenge and ask you to make your own ice cream – a first for the DBrs. You can choose any flavor you want and any recipe although we provided two vanilla ice cream recipes. We are giving you a little freedom here and will allow whipped cream as a topping as well or of course non-dairy whip. Be as creative as you want with your topping. Any fruit puree or sauce would be lovely with this cake.
- It is optional to use a heart shaped pan. For a real Valentino, bake it in a heart shaped pan or cut it out into a heart shape. You may use any shape pan that gives you an area of 50” - 6x8 or 7x7. An 8” spring form pan works with great results as do smaller pans or ramekins.
What you need to know:
- A higher cocoa percentage increases the bitterness of the chocolate, which means the darker the chocolate, the denser the cake
- Use your favorite chocolate – the finished cake will taste exactly like the chocolate you use. Be creative with your chocolate, if you like a sweeter cake use milk chocolate or a combination of the semisweet and milk chocolate. If you like bittersweet chocolate use that and add sweetness by mixing the semi sweet with bittersweet. If you are daring, try white chocolate.
- The cake will sink a little as it cools but will still hold its shape and the top forms a light crust kind of like a brownie.
Chocolate Valentino – 8-inch cake
16oz (454 grams) bittersweet chocolate, roughly chopped
½ cup plus 2 tablespoons (146 grams) unsalted butter
5 large eggs, separated
Put chocolate and butter in a heatproof bowl and set over a pan of simmering water (the bottom of the bowl should not touch the water) and melt, stirring often.
While the chocolate butter mixture is cooling. Butter the pan and line with a parchment circle then butter the parchment.
Separate the egg yolks from the egg whites and put into two medium/large bowls. Whip the egg whites in a large grease free bowl until stiff peaks are formed (do not over-whip or the cake will be dry). With the same beater beat the egg yolks together then add the egg yolks to the cooled chocolate.
Fold in 1/3 of the egg whites into the chocolate mixture and follow with the remaining 2/3. Fold until no white remains without deflating the batter. Pour batter into prepared pan, the batter should fill the pan 3/4 of the way full, and bake at 375°F/190°C。
Bake for 25 minutes until an instant read thermometer reads 140°F/60°C。.
Note – If you do not have an instant read thermometer, the top of the cake will look similar to a brownie and a cake tester will appear wet.Remove cake from oven and cool on rack for 10 minutes then unmold and let cool completely.
Chocolate Sorbet - makes 1 quart
adopted from The Essence of Chocolate
2 cups unsweetened cocoa powder
1 ¾ cup granulated sugar
4 cups water
1tsp pure vanilla extract
Combine cocoa powder and sugar in a saucepan. Whisk in 1 cup of the water until any large lumps of powder are broken up, then whisk in the remaining water, 1 cup at a time, and whisk until all dry ingredients are dissolved.
Bring the mixture to just a boil over medium heat, whisking occasionally. Remove from heat and stir in the vanilla extract. Pour mixture into a bowl, let cool then refrigerate overnight. The following day, place the sorbet base in an ice cream maker and freeze following the manufacturer’s instruction.
Acacia Honey Sorbet
makes 1 quart
¾ cup plus 2 tablespoon Acacia honey
4 cups water
1tsp vanilla extract
Combine honey and water in a saucepan and bring the mixture to a simmer over medium heat, stirring to dissolve the honey. Remove from heat and stir in the vanilla extract. Pour mixture into a bowl, let cool then refrigerate overnight. The following day, place the sorbet base in an ice cream maker and freeze following the manufacturer’s instruction.
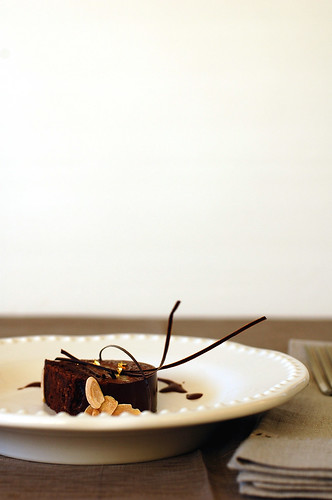
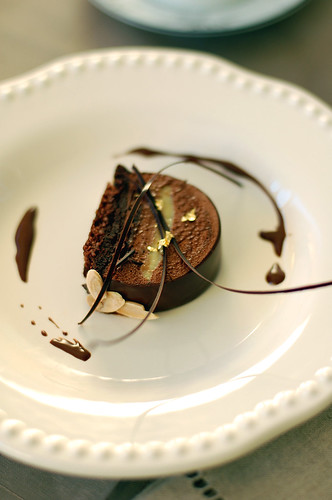
Plating:
Using a small heart shaped cookie cutter, stamp out little cake hearts. Place the hearts on plate, scope out the sorbets and place it on cake. Add the chocolate praline feuillete (recipe here) and top with edible gold. If you like, you may drizzle chocolate sauce on top of all.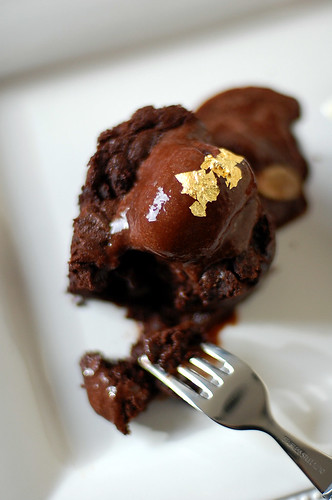
抱歉喔﹐說好過兩天會補上食譜的﹐結果過這麼久才貼。這幾天都不在家﹐還有舊金山灣區下了好些天的雨﹐讓我心情鬱悶到不行﹐懶懶的什麼都不想做。還好這兩天太陽伯伯終於露臉了﹐我的心情也跟著放晴 =)
這個純巧克力蛋糕又名巧克力華倫天奴是我二月的Daring Bakers的培烘挑戰。這個月的hostess選用了據說是馬來西亞最華麗耀眼的美食大使Chef Wan 的Sweet Treats 書裡的食譜。雖然不知為什麼以華倫天奴命名﹐但這名字好像常跟浪漫掛鉤﹐我想以這命名的蛋糕是想讓吃到蛋糕的人感受到甜甜濃濃的愛意吧﹗這麼說頗適合送給情人﹐特別在情人節又或是送給喜歡的人表白。。呵呵。。。
此款蛋糕的特色是完全沒有添加任何麵粉,能輕鬆﹑近乎零失敗的在家製作。口感吃起來外層乾、脆,有點像布朗尼蛋糕但內層比布朗尼蛋糕更濕潤綿密,含有濃濃的巧克力味。單吃蛋糕好像單調了點﹐所以建議佐冰淇淋或醬汁一同享用。Hostess提供了香草冰淇淋的做法﹐可我想嘗試不一樣的口味配搭。早前朋友送我一本Scharffen Berger 創辦人寫的巧克力食譜書﹐裡頭有個巧克力雪酪讓我心癢癢的想吃很久了﹐這下終於付諸行動製作手工雪酪了。很容易製作的說﹐然而口感濃稠綿密﹑入口即化。
眼看雪酪這麼好製作﹐決定再弄其他的口味。因為不是人人喜歡濃郁的口味﹐就想來點清爽的﹐那就花蜜口味好了。自從使用洋槐花蜜製作慕斯就喜歡上這個味道﹐喜歡它淡淡的花香﹐我想用作雪酪的調味應該也不錯。還真的是不賴﹐綿綿的口感﹐非常清爽可口﹐很滋味。
你應該知道的事 - 蛋糕:
- 完全沒加麵粉﹐只需3樣材料就能做出的一個蛋糕。烤好的蛋糕中心會稍微下陷﹐但蛋糕體的形狀還是膨膨的。
- 選用的巧克力的可可脂肪越高也代表味道越濃郁﹐也就說蛋糕體越是稠密濃厚。
- 這個蛋糕的風味完全就是你選用的巧克力的拷貝品﹐所以建議使用你鍾愛的巧克力種類。
巧克力華倫天奴蛋糕– 8寸 (20.5cm) 圓形模具1個
16oz (454g) 苦甜巧克力﹐切碎
½ 杯 加 2湯匙 (146g) 無鹽奶油﹐切丁
5 個 L尺碼蛋黃
5 個 L尺碼蛋白
事前準備:
- 將一烤架移到烤箱中格﹐烤箱預熱至375°F/190°C。
- 模具抹上一層奶油﹐鋪上烤盤紙﹐再在紙上抹上一層奶油﹐備用。
先燒開一小鍋的水﹐備用。將切碎的巧克力和切丁的奶油混合倒進一個耐熱的容器裡﹐放小鍋上(容器不能碰到熱水)隔熱水不停攪拌至順滑﹐完全融化為止。放一旁降溫。
在另一碗中加進蛋白﹐用電動攪拌器以中速攪打蛋白﹐攪打至富含空氣且顏色變白出現尖角程度為止﹐約3分鐘﹐蛋白霜就完成了。跟著將蛋黃倒進另一個拌碗中﹐打發至顏色變鵝黃色﹐然後拌進微溫的巧克力中﹐拌勻。
將1/3量的蛋白霜加進巧克力蛋糊中﹐用橡皮刀輕輕的源邊往下刮翻切拌勻。再分兩次拌進剩下的蛋白霜﹐刮翻切拌勻至不見任何蛋白霜即可。
將麵糊倒進模具中﹐將麵糊推勻﹐輕輕敲一下烤模釋放氣泡後﹐放進預熱過的烤模裡﹐以375°F/190°C烘烤約25分鐘。將糖果溫度計插入蛋糕中央﹐如果溫度到達140°F/60°C﹐蛋糕就烤好了。如果沒有糖果溫度計也可以用竹籤插入中央﹐慢慢拔出時不會沾黏但還是濕濕的﹐而蛋糕表面已形成一層硬薄膜(有點像布朗尼蛋糕的薄膜)就好了。從烤箱取出﹐擺在網架上放涼5分鐘﹐然後翻轉倒扣脫模﹐翻轉﹐整個放涼後用心形餅乾模吸切割出小蛋糕。
如果不立刻使用﹐可將蛋糕包好放冰箱存放﹐可以保存3天﹐使用前靜置回溫即可。 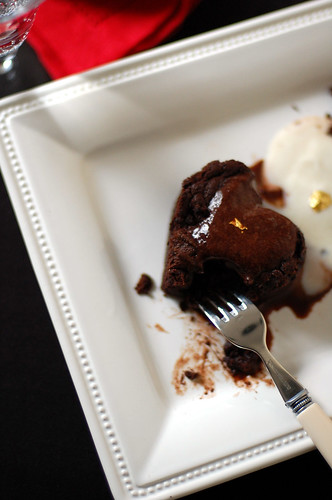
你應該知道的事 - 雪酪:
- 類似冰淇淋的雪酪(sorbet),跟冰淇淋的區別是完全不含乳脂製品﹐多以新鮮果泥、果汁為主要成分。
- 新鮮做的雪酪有點柔軟,如果喜歡吃質地硬一點的,將雪酪放進冰箱多冷凍1小時。
巧克力雪酪 – 4杯份量
食譜摘自The Essence of Chocolate
2杯 無糖可可粉﹐篩過
1 ¾ 杯 砂糖
4 杯 水
1茶匙 香草精
把篩過的無糖可可粉、砂糖混合裝進小鍋裡,慢慢注入1杯水﹐攪拌勻後再注入餘下的3杯水﹐拌至可可粉及砂糖溶解為止。以中火煮沸,熄火,加進香草精﹐拌勻。將可可漿倒進1個大碗中﹐放涼後再放冰箱冷藏一個晚上。從冰箱取出雪酪基地﹐倒進冰淇淋機裡,然後根據製造商的指示製作雪酪。
洋槐花蜜風味雪酪 – 4杯份量
¾杯加2湯匙 洋槐花蜜
4杯 水
1茶匙 香草精
把洋槐花蜜、水混合裝進小鍋裡,以中火煮至沸騰花蜜完全溶解,熄火。加進香草精﹐拌勻後倒進1個大碗中﹐放涼後再放冰箱冷藏一個晚上。從冰箱取出雪酪基地﹐稍攪拌直到它變得有點順滑後,倒進冰淇淋機裡,然後根據製造商的指示製作雪酪。
組合擺飾:
將用心形餅乾模吸切割出的心形小蛋糕﹐擺放在碟子中央。將雪酪挖成橢圓形狀的小球﹐然後放在蛋糕的上方。將切成三角形狀的巧克力千層酥(食譜點這裡)插在蛋糕體﹐再擺些烤過的杏仁片﹑食用金箔點綴即可。如果喜歡﹐也可以擠些巧克力醬。
Saturday, February 28, 2009
Daring Bakers Challenge: February Chocolate Bonanza ~ 純巧克力蛋糕佐巧克力﹑洋槐花蜜風味雪酪
Tuesday, December 30, 2008
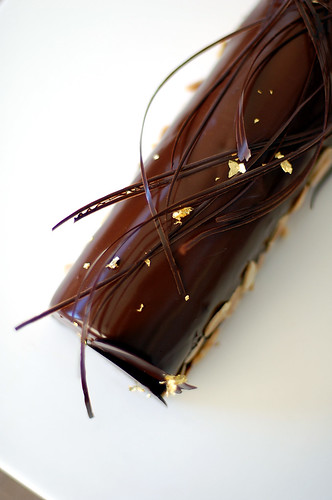
December Daring Bakers' Challenge: Entremets au chocolat ~ French Yule Log - 極緻的巧克力樹幹慕斯
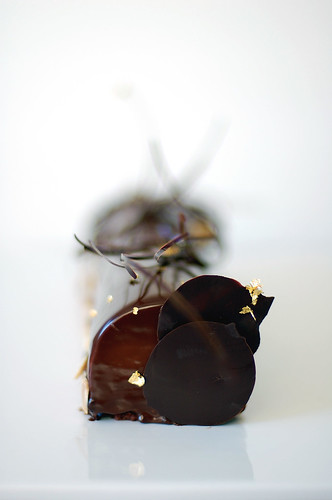
This month's challenge is brought to us by the adventurous Hilda from Saffron and Blueberry and Marion from Il en Faut Peu Pour Etre Heureux. They have chosen a French Yule Log by Flore from Florilège Gourmand!
What is a French Yule Log? According to our hostesses, you can buy two kinds of Yule log in France, the Genoise or Buttercream type. However, what is more commonly purchased is a frozen Yule Log very reminiscent of an ice cream cake, only often it’s not made of ice cream but rather frozen mousse of some sort. In French this is called an entremets which is sometime loosely translated in English as simply as a cream dessert. This also means that this recipe is not holiday specific - it is just a scrumptious dessert recipe that you can enjoy year round!
The recipes of most elements come almost entirely from Florilège Gourmand, which belongs to Flore, except for one small labeled portion and some of the variations courtesy of our dear Daring Baker fairy Tartelette. Different recipes have been pulled from the entremet section of Flore’s site to make up this masterpiece. Also, since Flore’s blog is written in French, hugs to the hostesses for the translation! Thank you ladies for choosing this beautiful and absolutely scrumptious dessert!
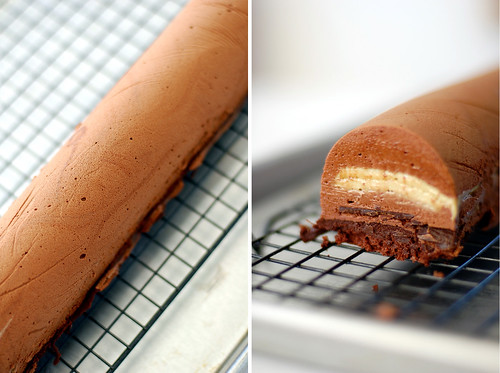
Before we begin, I just want to let you know that this may look impossible to complete but I assure you that this looks 100 times harder than it really is! The key to success is organization! As long as you complete each element in the order that it calls for, you are half way there, what is left is how to assemble and to decorate. On top of this, I strongly advise you to break the elements into 2 days so you have enough time to draft up the final look of this dessert. You see, I bake the crème brûlée and make the chocolate praline crisp the night before and let them set in the refrigerator. Bake the dacquoise biscuit the next morning, while it is being cool, I whipped up the mousse. Assemble these elements and let set in the fridge. Meanwhile, make the ganache and complete the log composition. Later in the afternoon, demold and cover the log with glaze to complete it. Decorate it an hour before serving.
Now, enjoy the ooh and ahh from your friends and family, my dear^^
Here are the rules for the CHALLENGE - MUST MAKE ALL 6 of the following elements for the log:
1) dacquoise biscuit
2) mousse
3) ganache Insert
4) praline (Crisp) Insert
5) crème brûlée Insert
6) Icing/glaze
Some things to keep in mind:
- You are of course free to flavor your layers differently, we realize not everyone likes chocolate; it was just the simplest way to introduce variations. You will notice there are fruit variations in a couple of the components, you may of course do fruit flavoring for all of them, but we can’t guarantee we know exactly how to change the recipe in that case, so bear with us and we’ll try to help you out as much as possible.
- PLEASE READ THE NOTES AT THE BEGINNING OF EVERY SECTION. They should help you with most questions you may have, at least we hope.
- Please look at the pictures of the “new” components in this recipe that you may never have seen before and at a completed log courtesy of Marion running a test at the very end of the recipe.
- We’ve tried to give you as many measuring units as possible (this recipe started out in grams only). We hope this helps. Imperial units (tbsp etc…) are American.
- For all our alternative bakers, the recipe is so long we didn’t know where to start even asking Nathalie to do a gluten-free one, so please feel free to ask, we’ll do our best to help you.

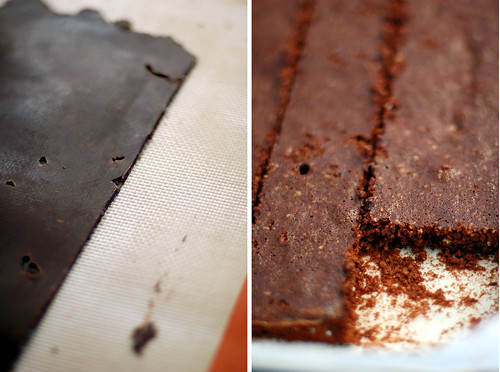
Element #1 ~ Praline Feuillete (Crisp) Insert
Note: Feuillete means layered (as in with leaves) so a Praline Feuillete is a Praline version of a delicate crisp. There are non-praline variations below. The crunch in this crisp comes from an ingredient which is called gavottes in French. Gavottes are lace-thin crepes. To our knowledge they are not available outside of France, so you have the option of making your own using the recipe below or you can simply substitute rice krispies or corn flakes or Special K for them. If you want to make your own praline, please click here.
Gavottes (lace crepes - recipe by Ferich Mounia) yields 60g
1/3cup (80ml) whole milk
2/3tbsp (8g) unsalted butter
1/3cup minus 2tsp (35g) all-purpose flour
1tbsp (15g) beaten egg
1tsp (3.5g) granulated sugar
½tsp vegetable oil
1. Heat the milk and butter together until butter is completely melted. Remove from the heat.
2. Sift flour into milk-butter mixture while beating, add egg and granulated sugar. Make sure there are no lumps.
3. Grease a baking sheet and spread batter thinly over it.
4. Bake at 430°F (220°C) for a few minutes until the crepe is golden and crispy. Let cool.
Chocolate Praline Feuillete:
100g bittersweet chocolate
1 + 2/3tbsp (25g) unsalted butter
2tbsp (30g) praline
60g gavottes or 2tbsp rice krispies or corn flakes
1. Melt the chocolate and butter in a double boiler.
2. Add the praline and the coarsely crushed lace crepes. Mix quickly to thoroughly coat with the chocolate.
3. Spread between two sheets of wax paper to a size slightly larger than your desired shape. Refrigerate until hard.
Element #2 ~ Jasmine-infused Crème Brulée Insert
Note: The crème brulée can be flavored differently by simply replacing the jasmine with something else e.g. cardamom, lavender, etc...
½ cup (115g) heavy cream
½ cup (115g) whole milk
4 med (72g) egg yolks
2tbsp (25g) granulated sugar
1tsp premium loose jasmine tea leave
1. Heat the milk, cream, and jasmine tea leave to just boiling. Remove from the heat and let the jasmine infuse for about 12 minutes.
2. Whisk together the sugar and egg yolks (but do not beat until white).
3. Pour the jasmine-infused milk over the sugar/yolk mixture and mix well.
4. Wipe with a very wet cloth and then cover your baking mold (whatever shape is going to fit on the inside your Yule log/cake) with parchment paper. Place it into a large roasting pan then pour hot water into the roasting pan all the way up half way of the baking mold. Pour the cream into the mold and bake at 210°F (100°C) for about 1 ½ hour or until firm on the edges and slightly wobbly in the center.5. Let cool and put in the freezer for at least 1 hour to firm up and facilitate the final assembly.
Tartelette says: You can bake it without a water bath since it is going to go inside the log (the aesthetics of it won't matter as much since it will be covered with other things)....BUT I would recommend a water bath for the following reasons:
- you will get a much nicer mouth feel when it is done
- you will be able to control its baking point and desired consistency much better
- it bakes for such a long time that I fear it will get overdone without a water bath
Now...since it is baked in a pan and it is sometimes difficult to find another large pan to set it in for a water bath, even a small amount of water in your water bath will help the heat be distributed evenly in the baking process. Even as little as 1 inch will help.
Element #3 ~ Dacquoise Biscuit (Almond Cake)
Note: You can use the Dacquoise for the bottom of your Yule Log only, or as bottom and top layers, or if using a Yule log mold (half-pipe) to line your entire mold with the biscuit. Take care to spread the Dacquoise accordingly. Try to bake the Dacquoise the same day you assemble the log to keep it as moist as possible.
¾ cup + 1Tbsp (80g) almond meal
½ cup (50g) confectioner’s sugar
2tbsp all-purpose flour
3tbps unsweetened cocoa powder, sifted
100g about 3 med egg whites
4tbsp (50g) granulated sugar
1. In a mixer, pulse the together the almond meal and the confectioner's sugar for no longer than 30 seconds then sift in the unsweetened cocoa powder. Finely mix all ingredients until incorporated.
2. Sift the flour into the mix.
3. Beat the eggs whites, gradually adding the granulated sugar until stiff.
4. Pour the almond meal mixture into the egg whites and blend delicately with a spatula.
5. Grease a piece of parchment paper and line your baking pan with it.
6. Spread the batter on a piece of parchment paper to an area slightly larger than your desired shape (circle, long strip etc...) and to a height of 1/3 inches (8mm).
7. Bake at 350°F (180°C) for approximately 15 minutes (depends on your oven), until golden. 8. Let cool and cut to the desired shape.
Element #4 ~ Bittersweet Chocolate Mousse
Note: You will see that a Pate a Bombe is mentioned in this recipe. A Pate a Bombe is a term used for egg yolks beaten with sugar syrup then aerated. It is the base used for many mousse and buttercream recipes. It makes mousses and buttercreams more stable, particularly if they are to be frozen, so that they do not melt as quickly or collapse under the weight of heavier items such as the crème brulee insert. In the Vanilla Mousse variation, pastry cream is made to the same effect. In the Mango Mousse variation, Italian meringue is made to the same effect. Italian meringue is a simple syrup added to egg whites as they are beaten until stiff. It has the same consistency as Swiss meringue (thick and glossy) which we have used before in challenge recipes as a base for buttercream. The whipped Cream option contains no gelatin, so beware of how fast it may melt.
Gelatin/Gelatine is the gelifying agent in all of the following recipes, but if you would like to use agar-agar, here are the equivalencies:
8g powdered gelatin = 1 (0.25 oz) envelope powdered gelatin = 1 Tbsp powdered gelatin = 1 Tbsp Agar-Agar. 1 Tbsp. of agar-agar flakes is equal to 1 tsp. of agar-agar powder.
2.5 sheets gelatin or 5g powdered gelatin
3 tbsp (40g) granulated sugar
1 ½ tsp (10g) glucose or thick corn syrup
1tbsp (15g) water
50g (3 med.) egg yolks
175g bittersweet chocolate, coarsely chopped
1.5 cups (350g) heavy cream
1. Soften the gelatin in cold water. (If using powdered gelatin, follow the directions on the package.)
2. Make a Pate a Bombe: beat the egg yolks until very light in color (approximately 5 minutes until almost white).
3. Cook the sugar, glucose syrup and water on medium heat for approximately 3 minutes (if you have a candy thermometer, the mixture should reach 244°F (118°C). If you do not have a candy thermometer, test the sugar temperature by dipping the tip of a knife into the syrup then into a bowl of ice water, if it forms a soft ball in the water then you have reached the correct temperature.4. Add the sugar syrup to the beaten yolks carefully by pouring it into the mixture in a thin stream while continuing to beat the yolks. You can do this by hand but it’s easier to do this with an electric mixer. Continue beating until cool (approximately 5 minutes). The batter should become thick and foamy.3. In a double boiler or equivalent, heat 2 tablespoons of cream to boiling then add the chopped chocolate and stir until melted and smooth.
4. Whip the remainder of the cream until stiff.
5. Pour the melted chocolate over the softened gelatin, mixing well. Let the gelatin and chocolate cool slightly and then stir in ½ cup of WHIPPED cream to temper then add the Pate a Bombe.
6. Add in the rest of the WHIPPED cream mixing gently with a spatula until incorporated.
Element #5 ~ Jasmine-infused Dark Chocolate Ganache Insert
Note: Because the ganache hardens as it cools, you should make it right before you intend to use it to facilitate piping it onto the log during assembly. Please be careful when caramelizing the sugar and then adding the cream. It may splatter and boil.
4tbsp (50g) granulated sugar
1tsp premium loose jasmine tea leave
135g dark chocolate, finely chopped
3tbsp + ½ tsp (45g) unsalted butter softened
2/3 cup minus 1tbsp (135g) heavy cream
1. Add the jasmine tea leave to the heavy cream and let steep in the fridge overnight. Strain before use. 2. Make a caramel: Using the dry method, melt the sugar by spreading it in an even layer in a small saucepan with high sides. Heat over medium-high heat, watching it carefully as the sugar begins to melt. Never stir the mixture. As the sugar starts to melt, swirl the pan occasionally to allow the sugar to melt evenly. Cook to dark amber color (for most of you that means darker than last month’s challenge).
2. While the sugar is melting, heat the jasmine infused cream until boiling. Pour cream into the caramel and stir thoroughly. Be very careful as it may splatter and boil.
3. Pour the hot caramel-milk mixture over the dark chocolate. Wait 30 seconds and stir until smooth.
4. Add the softened butter and whip hard and fast (if you have a plunging mixer use it). The chocolate should be smooth and shiny.
Element #6 ~ Dark Chocolate Glaze/Icing
Note: Because the icing gelifies quickly, you should make it at the last minute.For other gelatin equivalencies or gelatin to agar-agar equivalencies, look at the notes for the mousse component.
½ tbsp powdered gelatin or 2 sheets gelatin
¼ cup (60g) heavy cream
5tbsp (60g) granulated sugar
¼ cup (50g) water
1/3 cup (30g) unsweetened cocoa powder
1. Soften the gelatin in cold water for 15 minutes.
2. Boil the rest of the ingredients and cook an additional 3 minutes after boiling.
3. Add gelatin to the chocolate mixture. Mix well.
4. Let cool while checking the texture regularly. As soon as the mixture is smooth and coats a spoon well (it is starting to gelify), use immediately.
How to assemble your French Yule Log:
Depending on whether your mold is going to hold the assembly upside down until you unmold it or right side up, this order will be different.
THIS IS FOR UNMOLDING FROM UPSIDE DOWN TO RIGHT SIDE UP. You will want to tap your mold gently on the countertop after each time you pipe mousse in to get rid of any air bubbles.1. Line your mold or pan, whatever its shape, with rhodoid (clear hard plastic, I usually use transparencies cut to the desired shape, it’s easier to find than cellulose acetate which is what rhodoid translates to in English) OR plastic film. Rhodoid will give you a smoother shape but you may have a hard time using it depending on the kind of mold you’re using.
You have two choices for Step 2, you can either have Dacquoise on the top and bottom of your log as in version A or you can have Dacquoise simply on the bottom of your log as in version B:
2. Cut the Dacquoise into a shape fitting your mold and set it in there. If you are using an actual Yule mold which is in the shape of a half-pipe, you want the Dacquoise to cover the entire half-pipe portion of the mold.
3. Pipe one third of the Mousse component on the Dacquoise.
4. Take the crème brulee insert out of the freezer at the last minute and set on top of the mousse. Press down gently to slightly ensconce it in the mousse.
5. Pipe second third of the Mousse component around and on top of the crème brulee Insert.
6. Cut the Praline/Crisp Insert to a size slightly smaller than your mold so that it can be surrounded by mousse. Lay it on top of the mousse you just piped into the mold.
7. Pipe the last third of the Mousse component on top of the Praline Insert.
8. Freeze for a few hours to set. Take out of the freezer.
9. Pipe the Ganache Insert onto the frozen mousse leaving a slight edge so that ganache doesn’t seep out when you set the Dacquoise on top.
10. Close with the last strip of Dacquoise.
Freeze until the next day.
OR
1. Pipe one third of the Mousse component into the mold.
2. Take the crème brulee insert out of the freezer at the last minute and set on top of the mousse. Press down gently to slightly ensconce it in the mousse.
3. Pipe second third of the Mousse component around and on top of the crème brulee insert.
4. Cut the Praline/Crisp Insert to a size slightly smaller than your mold so that it can be surrounded by mousse. Lay it on top of the mousse you just piped into the mold.
5. Pipe the last third of the Mousse component on top of the Praline Insert.
6. Freeze for a few hours to set. Take out of the freezer.
7. Pipe the Ganache Insert onto the frozen mousse leaving a slight edge so that ganache doesn’t seep out when you set the Dacquoise on top.
8. Close with the Dacquoise.
Freeze until the next day.
If you are doing the assembly UPSIDE DOWN with TWO pieces of Dacquoise the order is:
1) Dacquoise
2) Mousse
3) Crème Brulee Insert
4) Mousse
5) Praline/Crisp Insert
6) Mousse
7) Ganache Insert
8) Dacquoise
If you are doing the assembly UPSIDE DOWN with ONE piece of Dacquoise on the BOTTOM ONLY the order is:
1) Mousse
2) Crème Brulee Insert
3) Mousse
4) Praline/Crisp Insert
5) Mousse
6) Ganache Insert
7) Dacquoise
If you are doing the assembly RIGHT SIDE UP in a springform pan the order is:
1) Dacquoise
2) Ganache Insert
3) Mousse
4) Praline/Crisp Insert
5) Mousse
6) Crème Brulee Insert
7) Mousse
8 OPTIONAL) Dacquoise
THE NEXT DAY...
1. Unmold the cake/log/whatever and set on a wire rack over a shallow pan.
2. Cover the cake with the icing.
3. Let set. Return to the freezer.
4. You may decorate your cake however you wish. The decorations can be set in the icing after it sets but before you return the cake to the freezer or you may attach them on top using extra ganache or leftover mousse, etc...
5. Transfer to the refrigerator no longer than ½ hour before serving as it may start to melt quickly depending on the elements you chose.
就以巧克力為2008年完美的落幕吧﹗
這巧克力樹幹慕斯是Daring Bakers12月的指定挑戰品。蛋糕的食譜由自名為Florilège Gourmand的網站~
用上6種濃厚風味口感的甜點素材組合而成﹐步驟複雜但卻不會讓人感到構成的材料很多﹐是人人也可在家製作的一道甜點。對於口感的重視﹐是法國甜點獨一無二的特徵﹐雖然這蛋糕混合了多種巧克力﹐可又很奇妙的在舌頭上融合﹐使甘美的香氣合而為一。
#1 ~ 巧克力千層酥 - 直徑9x13in/23x34cm長方形烤模1個
3.5安士 (100g) 苦甜巧克力﹐切碎
1 + 2/3湯匙 (25g) 無鹽奶油
2湯匙 (30g) 榛果糖膏
60g法式薄餅or 2湯匙玉米片
蛋糕卷專用烤盤或長方形模具上鋪上烤盤紙﹐備用。將切碎的巧克力和無鹽奶油放進一個耐熱的碗裡﹐隔水加熱融化。用橡皮刀不停地攪拌至完全混合融化後﹐倒入榛果糖膏及玉米片快速攪拌勻。將巧克力糊倒在鋪了烤盤紙的模具中﹐推勻﹐再鋪上另一張烤盤紙輕壓鋪平。放進冰箱冷藏至定形成硬塊備用。
#2 ~茉莉口味烤布蕾 - 直徑8in或18 X18cm方形烤模1個
布蕾(又名烤布丁)可以做成很多不同的口味像香草﹑薰衣草﹑荳蔻﹑巧克力等等。
½ 杯 (115g) 鮮奶油
½ 杯 (115g) 全脂奶
4 個M尺寸(72g) 蛋黃
2湯匙 (25g) 砂糖
1茶匙 茉莉茶葉
將奶﹑鮮奶油及茉莉茶葉混合倒進小鍋裡﹐用中火慢慢加熱﹐ 煮至沸騰時立刻熄火﹐蓋上鍋蓋泡10 – 15分鐘。
預熱烤箱至210°F/100°C。將蛋黃和砂糖混合充份攪拌勻後 (不要攪拌至變淡白)﹐慢慢注入過濾後的茉莉熱奶漿﹐邊倒邊攪拌﹐攪拌至蛋奶漿變稠均勻後在奶漿上方鋪上一片餐巾紙﹐輕輕地吸取掉泡沫後倒進模具中。將模具放進有深度的烤盤裡﹐然後注入熱開水達模具一半的高度﹐再放進預熱過的烤箱裡烘烤90分鐘 (60分鐘後要不停的查看以免烤焦)。當搖晃模具時布蕾中央會抖動但週邊不動即烤好了。取出﹐待室溫放涼﹐蓋上保鮮膜﹐放冰箱冷卻一個小時或一個晚上。
#3 ~巧克力杏仁蛋白蛋糕(Dacquoise) - 直徑9x13in/23x34cm長方形烤模1個
令人心醉的香醇濃郁風味﹐香氣四溢﹐品嚐起來是紮實的堅果口感。保溼性佳,就算等上一段時間才享用,也不失其溼潤口感。
¾ 杯+ 1湯匙 (80g) 杏仁粉
½ 杯 (50g) 糖粉
2湯匙 麵粉
3湯匙 無糖可可粉﹐篩過
100g (約3個M尺碼) 蛋白
4湯匙 (50g) 砂糖
事前準備:
- 將一烤架移到烤箱下格﹐烤箱預熱至350°F/180°C。
- 蛋糕卷專用烤盤或長方形模具上鋪上烤盤紙﹐備用。
將杏仁粉﹑糖粉用食物處理器攪打30秒﹐篩入可可粉﹐攪打至混合﹐再篩入麵粉﹐拌勻備用。
另一mixing bowl裡加進蛋白﹐用電動攪拌器以中速攪打蛋白﹐小量地加進砂糖﹐攪打至富含空氣且顏色變白出現尖角程度為止﹐約3分鐘。小量地將杏仁粉加進蛋霜中﹐用橡皮刀輕輕的源邊往下刮翻切拌勻。
將麵糊倒進模具中﹐將麵糊推勻﹐輕輕敲一下烤模釋放氣泡後﹐放進預熱過的烤模裡﹐以350°F/180°C烘烤約15分鐘。等烤到週圍會因烤熟而稍稍縮小﹐烤模和蛋糕體間就會出現空隙﹐輕按蛋糕中間時感覺到彈性即烤好。也可以用竹籤插入中央﹐慢慢拔出時不會沾黏﹐就烤好了。從烤箱取出﹐擺在網架上放涼5分鐘﹐然後翻轉倒扣脫模﹐整個放涼後切割成長方形狀(比模具稍微小一點)。
如果不立刻使用﹐可將蛋糕包好放冰箱存放﹐可以保存3天。如果放冰格冷藏可以存放1個月。使用前靜置回溫即可。
#4 ~ 黑巧克力慕斯
pâte à bombe指的是將熱的糖漿加入蛋黃中充份打發至富含空氣的蛋漿糊。是很多奶油餡及慕斯甜點的基底﹐可讓其更固定﹐成托力更好及不易融化。
3 湯匙 (40g) 砂糖
1½ 茶匙 (10g) 玉米糖漿或純葡萄糖
1湯匙 (15g) 清水
50g (約3個) 蛋黃
175g 苦甜巧克力﹐切碎
1杯半(350g) 鮮奶油
2.5片魚膠片或5g 魚膠粉
事前準備:
- 明膠片用冰水泡軟之後擠掉水分﹐備用。如果用明膠粉: 將明膠粉倒入水裡 (2大匙) 泡脹後備用。
製作pâte à bombe:
Mixing bowl裡加進蛋黃﹐用電動攪拌器以中速打發至顏色變淡白﹐約5分鐘。打發蛋黃的同時﹐邊將砂糖﹑玉米糖漿﹑及清水混合倒進鍋子裡用中火加熱。約煮3分鐘至溫度為244°F /118°C為止。如果沒有糖果溫度計﹐舀取1小匙糖漿滴到冷水中﹐取出在手指間 搓揉﹐若能成為小球狀的濃度即可﹐離火。
用電動攪拌器以低速繼續打發蛋黃﹐邊將糖漿細絲般的慢慢地注入蛋漿中(千萬不要攪拌糖漿會結晶的),完全注入糖漿後轉中速繼續打發﹐打至冷卻富含空氣變結實的程度﹐約5分鐘﹐備用。
製作慕斯:
將2湯匙的鮮奶油以中火煮沸﹐離火。加入切碎的苦甜巧克力﹐讓靜置2分鐘﹐然後用橡皮刀攪拌至順滑﹐紋理細緻且有光澤為止﹐稍微放涼。巧克力漿放涼的同時﹐用電動打蛋器打發剩餘的鮮奶油至變富含空氣出現尖角的程度。將泡軟的明膠片拌進還是流動狀態的巧克力漿裡﹐攪拌勻。拌入約3份1打發好的鮮奶油﹐拌勻後倒進pâte à bombe﹐用橡皮刀輕輕的源邊往下刮翻切拌勻。最後拌入剩下打發好的鮮奶油﹐用橡皮刀輕輕的源邊往下刮翻切拌勻。
#5 ~ 茉莉口味苦甜巧克力甘那許夾心 -1½ 杯份量
4湯匙 (50g) 砂糖
1茶匙 茉莉茶葉
135g 苦甜巧克力 (65 -70% 可可亞成份), 切碎
3湯匙 + ½ 茶匙 (45g) 無鹽奶油 - 室溫放軟﹐切成小方塊
135g 或2/3杯減1湯匙的 鮮奶油
鮮奶油與茶葉混合,放進冰箱,泡浸一個晚上。
將砂糖倒入小鍋裡﹐用中火加熱。不要攪拌砂糖但要不時的輕輕搖幾下﹐讓它不會煮焦。同時用別個鍋子將過濾後的茉莉鮮奶油以中火煮沸﹐離火。待砂糖完全融化證琥珀色時﹐將茉莉鮮奶油一鼓作氣倒進糖漿中﹐這時奶漿可能會四處飛濺﹐不要給燙到喔﹗這個時候糖漿會結晶﹐搖幾下鍋子﹐繼續煮2分鐘就會溶化﹐離火。
將焦糖漿慢慢地注入切碎的苦甜巧克力中﹐讓靜置2分鐘﹐然後用橡皮刀攪拌至順滑﹐加入奶油拌勻。改用打蛋器攪打至巧克力完全融化﹐全體出現光亮且黏稠滑順時即可。然後將甘那許倒進擠花袋裡備用。
#6 ~ 巧克力鏡面 – 1 ½ 杯份量
鏡面很容易凝固﹐所以最好在裝飾前製作。
¼杯 (60g) 鮮奶油
5湯匙 (60g) 砂糖
¼杯 (50g) 清水
1/3杯 (30g) 無糖可可粉
2片魚膠片或½ 湯匙魚膠粉
事前準備:
- 明膠片用冰水泡軟之後擠掉水分,備用。如果用明膠粉: 將明膠粉倒入水裡 (2大匙) 泡脹後備用。
將鮮奶油﹑砂糖﹑清水及無糖可可粉混合倒入小鍋裡﹐用中火加熱﹐不時攪拌讓液體不會煮焦﹐煮沸後繼續煮3分鐘。加入泡軟的明膠片﹐用橡皮刀攪拌均勻至順滑看不見碎粒即可﹐稍微放涼。待可可漿變稠﹐並可以在湯匙背劃出清晰的線條時就可使用。
螺旋狀巧克力裝飾
135g 苦甜巧克力﹐切碎
巧克力切碎後﹐放進一個耐熱的碗裡。碗一定要確實擦乾﹐不可有任何水份。放進microwave裡加熱。分4~5次﹐每一次間隔為30秒的加熱及調溫巧克力。每一次都要確實攪拌勻至完全融化的狀態﹐稍微放涼約一分鐘。
將蛋糕卷專用模具或方形模具倒轉﹐鋪上矽膠條(2.5x14in/6x40cm)。用抹刀的前端沾取少量的調溫後的巧克力﹐塗抹在矽膠片上﹐用鋸齒梳子劃出線條圖案﹐在常溫下凝固。待巧克力看上去是乾的但還沒有完全變硬的時候﹐將矽膠條捲成圓形螺旋狀﹐然後放置在半圓形模具中﹐在常溫下凝固定形後﹐再放進冰箱定形。
水滴狀巧克力裝飾
將蛋糕卷專用模具或方形模具倒轉﹐鋪上矽膠條/片。用抹刀的前端沾取少量的調溫後的巧克力﹐邊按壓在矽膠條/片上邊用手向前拉﹐形成水滴圖案﹐在常溫下凝固定形後﹐再放進冰箱定形。
組合及裝飾蛋糕:
事前準備:
- 在一個40X8cm的長半圓形模具鋪上一層保鮮膜(四邊留約2in/6cm的尾巴)﹐按壓出氣泡讓保鮮膜貼服﹐備用。
- 將巧克力千層酥切成約2.5in/6cm片狀的長方形條﹐備用。
- 將烤布蕾切割成2.5in/6cm片狀的長方形條﹐備用。
- 將蛋糕體切成4片比長半圓形模具小一點的長方形條﹐備用。
將黑巧克力慕斯倒進模具中至5分滿﹐推勻並薄薄地鋪平至模具邊緣﹐輕輕敲一下模具釋放氣泡。將烤布蕾條填入巧克力慕斯中﹐鋪上巧克力千層酥片﹐再一層薄薄的巧克力慕斯﹐推平﹐擠一層巧克力甘那許夾心在上﹐再鋪上薄薄的巧克力慕斯﹐推平﹐最後鋪上蛋糕條﹐往下輕按﹐將蛋糕放入冰箱冷卻定形3小時或一個晚上。
取出蛋糕﹐兩手拉著保鮮膜往上提﹐待蛋糕體可以拉離模具時翻轉倒扣脫模。切去表面四週的蛋糕體﹔製作巧克力鏡面。
將蛋糕連網架擺放在深的烤盤上。將微溫的鏡面淋在蛋糕上﹐任鏡面溢滿源周邊流下包覆整個蛋糕(連烤盤一起提起輕敲一下會幫助甘那許源邊流下)。記住這時動作要迅速,因為溫度容易下降﹐鏡面很快就會凝固。讓蛋糕靜置凝固15分鐘才可以裝飾蛋糕。
在蛋糕表面撒一些食用金箔粉﹐然後貼一些烤杏仁片在蛋糕側面﹐隨意擺放巧克力旋渦條﹐再在蛋糕前後方黏幾片裝飾巧克力片﹐最後加點食用金箔點綴即可。將蛋糕放進冰箱冷藏30分鐘固定。
Thursday, October 30, 2008
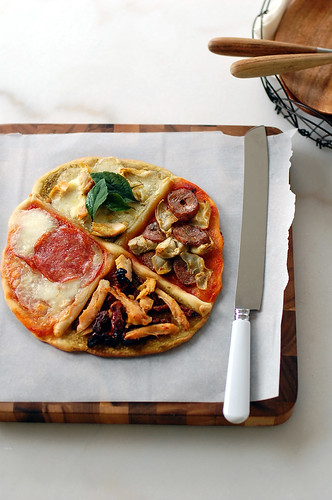
October Daring Bakers' Challenge - Playing Pizzaiolo! ~ 挑戰手工薄餅
Well, I know I am fashionably late for this month’s DB challenge hosted by Rosa of Yummy Yums but you know what they say? Better late than never =)
As I mentioned before, my new job is sort of demanding so I couldn’t spend as much time in the kitchen as I wanted to. October challenge almost didn’t happen but since I already missed last month and the month before last, I just couldn’t skip this month’s challenge especially when the challenge is to make pizza dough from scratch! Yup, that is right – I am playing pizzaiolo =]
For this challenge Rosa chose an easy to follow recipe for Pizza Napoletana from Peter Reinhart's The Bread Baker's Apprentice, which promises to yield a beautifully tasty, thin, crispy, yet chewy pizza crust and it was all the above indeed =D
Rosa requests (though not a must) we take pictures or video ourselves when tossing the dough but I found it rather difficult to do with my remote. It turned out to be a blur :,( My tossing didn’t turn out a success either. I think it is because my dough was too small! I will give this another try some other time and shall report back.
As for the toppings, I couldn’t decide what to put since I wanted everything! So I ended up making a pizza with four different toppings flavor combos – mozzarella + salami, chicken + pesto + sun-dried tomato, sausage + artichoke heart, and chicken + mozzarella! I almost want to make a sweet pizza too but was too full after eating this fully loaded pizza^^
If you want to see more exciting topping variations click here. Enjoy!

Daring Bakers’ October Challenge – Pizza & Toppings
THE CHALLENGE: You have to use the tossing method (as explained below) for at least 2 Pizza Crusts. If you are not comfortable with it, then you can switch to the rolling method, but you HAVE to try the traditional method and exercise it, using at least two dough pieces. You should also capture the moment by either filming or photographing yourself while tossing the dough.
THE RULES: This month’s recipe leaves you with much freedom! You can either make the Pizza Dough gluten-free or the normal way. You may use the sauce (anything liquidy, saucy and spreadable like cream cheese, flavored oils, pesto, Nutella, Peanut Butter, pumpkin puree, etc...) and toppings of your choice, may they be savory or sweet, gluten-free, vegan, vegetarian or non-vegan/vegetarian. You must use BOTH (sauce & toppings).
Posting date: Wednesday, October the 29th 2008
Basic Pizza Dough
Original recipe from The Bread Baker’s Apprentice by Peter Reinhart
Makes 8 pizza crusts (about 8-10 inches)
4 ½ Cups all purpose flour, chilled
1 ¾ tsp salt
1tsp instant yeast
¼ cup olive oil or vegetable oil (both optional, but it’s better with)
1 ¾ cups water, ice cold
1tbs sugar
Extra flour or cornmeal for dusting
Toppings:
mozzarella cheese
grilled chicken
sun-dried tomato
artichoke hearts
sausages
salami
pesto
I thought you should know:
- This will take 2 days to make.
- Bake only one pizza at a time.
- You can also resort to using a rolling pin, although it isn’t as effective as the toss method.
- In case you would be having trouble tossing the dough or if the dough never wants to expand and always springs back, let it rest for approximately 5-20 minutes in order for the gluten to relax fully then try again.
How to store extra dough balls:
You can store the dough balls in a zippered freezer bag if you want to save some of the dough for any future baking. In that case, pour some oil(a few tablespooons only) in a medium bowl and dip each dough ball into the oil, so that it is completely covered in oil. Then put each ball into a separate bag. Store the bags in the freezer for no longer than 3 months. The day before you plan to make pizza, remember to transfer the dough balls from the freezer to the refrigerator.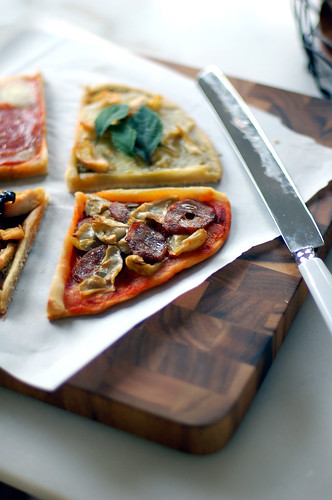
Day 1
Mix together the flour, salt and instant yeast in a big bowl (or in the bowl of a stand mixer like me). Add the oil, sugar and cold water and mix well (with the help of a large wooden spoon or with the paddle attachment, on low speed) in order to form a sticky ball of dough. On a clean surface, knead for about 5-7 minutes, until the dough is smooth and the ingredients are homogeneously distributed. If it is too wet, add a little flour (not too much, though) and if it is too dry add 1 or 2 teaspoons extra water.
Or
If you are using an electric mixer, switch to the dough hook and mix on medium speed for the same amount of time.The dough should clear the sides of the bowl but stick to the bottom of the bowl. If the dough is too wet, sprinkle in a little more flour, so that it clears the sides. If, on the contrary, it clears the bottom of the bowl, dribble in a teaspoon or two of cold water.
The finished dough should be springy, elastic, and sticky, not just tacky, and register 50°-55° F/10°-13° C. Flour a work surface or counter. Line a jelly pan with baking paper/parchment. Lightly oil the paper.
With the help of a dough scraper, cut the dough into 8 equal pieces (or larger if you want to make larger pizzas). Sprinkle some flour over the dough. Make sure your hands are dry and then flour them. Gently round each piece into a ball.
Transfer the dough balls to the lined jelly pan and mist them generously with spray oil. Slip the pan into plastic bag or enclose in plastic food wrap. Put the pan into the refrigerator and let the dough rest overnight or for up to thee days.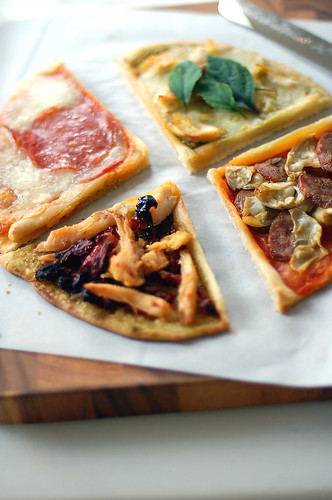
Day 2
On the day you plan to eat pizza, exactly 2 hours before you make it, remove the desired number of dough balls from the refrigerator. Dust the counter with flour and spray lightly with oil. Place the dough balls on a floured surface and sprinkle them with flour. Dust your hands with flour and delicately press the dough into disks about 1/2 inch/1.3 cm thick and 5 inches/12.7 cm in diameter. Sprinkle with flour and mist with oil. Loosely cover the dough rounds with plastic wrap and then allow to rest for 2 hours.
Preheat the oven as hot as possible (500° F/260° C). Generously sprinkle the back of a jelly pan with flour or cornmeal. Flour your hands. Take 1 piece of dough by lifting it with a pastry scraper. Lay the dough across your fists in a very delicate way and carefully stretch it by bouncing it in a circular motion on your hands, and by giving it a little stretch with each bounce and once the dough has expanded outward, move to a full toss.
When the dough has the shape you want, place it on the back of the jelly pan, making sure there is enough flour or cornmeal to allow it to slide and not stick to the pan. Top it with sweet or savory toppings of your choice.
Slide the garnished pizza directly on the jelly pan. Close the door and bake for about 5-8 minutes (it may take longer as no 2 ovens are the same). For an even baking, rotate 180° after 4 minutes. If the top gets done before the bottom, you will need to move the jelly pan to a lower shelf before the next round. On the contrary, if the bottom crisps before the cheese caramelizes, then you will need to raise the stone or jelly.
Take the pizza out of the oven and transfer it to a cutting board or your plate. In order to allow the cheese to set a little, wait 3-5 minutes before slicing or serving.
Wednesday, July 30, 2008
DB Challenge & August Birthday: Gâteau au praliné nappé de ganache ~ 焦糖榛果奶油夾心巧克力鏡面蛋糕

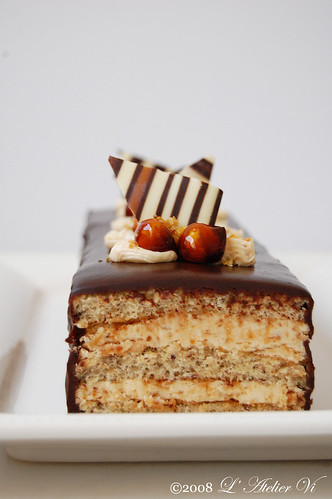
Here you see two cakes, one round, and one oblong shape. One cake for my monthly Daring Baker challenge, and one for the people who were born in August! Million thanks to our host Chris from Great Cakes by Carol Walter as this month’s DB challenge! I absolutely adore it!
The cake has three textures each with their own flavor – 2 layers of ultra creamy praline buttercream sandwiched between 3 layers of rum syrup moistened, ultra fragrant filbert (hazelnuts) genoise, and a layer of bittersweet chocolate ganache. Yes, this cake is very rich :)
The recipe may look lengthy but it was easy to execute though time consuming! Judging from the number of components called for this cake, I decided to do what I considered the easiest way – break them into days/steps like this:
- Day #1: Make all the components and set aside.
- Day #2: Assemble the cakes and let them chill in the fridge.
- Day #3: Decorate & garnish the cakes.
I found that by making the cakes this way that I can enjoy my weekend while getting it done in an orderly fashion! So how did it go?! Well, everything went smoothly for me except for the Swiss buttercream! It was grainy at first but became smooth & creamy after troubleshooting with the given advice. This was my 1st time making Swiss buttercream and I love how it tasted except that it was a bit too sweet for my taste. I think I would cut the sugar down by 1/3 when I make it next time. It is also my 1st time making praline paste too and it was way easier than I expected and it tastes heavenly! I have been munching on the left over paste for the last few days….gosh…all that calories….but it is soooo good……
The most challenging part was deciding how to decorate the cakes. Since I know nothing about the art of piping on cake like the master Carol Walter, I emphasized more on playing up the flavor of the cake! For the round, mini cake, I topped it with a little bit of praline buttercream (sprinkle with praline paste), some caramelize hazelnuts and a caramel sugar design. Since the side of the cake turned out rather bumpy, I covered with vanilla macarons. As for the oblong cake, I put tempered chocolate triangles instead of caramel sugar design, caramelize hazelnuts and praline buttercream. It just screams hazelnuts!
I really liked the final result in terms of flavors and textures. I also found that I can’t get enough of the chocolate and hazelnuts combination! Thanks again, Chris, for picking this fabulous recipe for the month =)
Fun facts: Filberts = hazelnuts?! Why are hazelnuts called filberts?
As quoted from About.com
“The most commonly accepted explanation is because hazelnuts mature on or around St. Philibert's Day, August 20. Other historians believe the term filbert derives from the German vollbart meaning full beard, a reference to the appearance of the husked shell. Although the current definition of filbert tends to refer to commercial cultivated crops of hazelnuts, the terms hazelnut and filbert are generally used interchangeably. Hazelnuts are also known as cobnuts in some areas. Other experts claim these are all different varieties of the nut, but once shelled; they are quite difficult to tell apart.”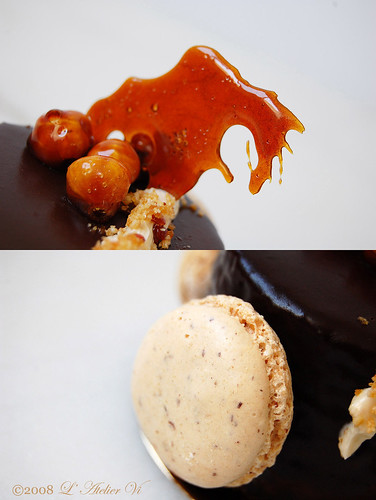
Here are the ground rules for the challenge:
• Recipe ingredient exception allowed if allergy or an ingredient is not available or cost prohibitive in your region. Otherwise, the recipe does need to have nut of some sort! You can use another nut, should you prefer, but carry it throughout. If allergic/too costly, please refer to the Alternative bakers for assistance.
• You may use a buttercream or whipped cream filling under the ganache. But, make sure you cite your source. Whatever you choose, the end result must be praline.
• Buttercream garnish/decoration can be however you choose, but it should be on the cake in some form.
• The glaze – you don’t need to use apricot flavor, use whatever flavor you prefer e.g. orange or raspberry. Fresh fruit is okay for the garnish only.
• If the indicated pan size is not available, use whatever round size you prefer, just know you may need to make adjustments, accordingly. This means you may halve (not 1/3) the recipe, or make mini-cakes but no cupcakes and it must be round!
• Alcohol is optional
Filbert Gateau with Praline Buttercream
From Great Cakes by Carol Walter
1 Filbert Genoise
1 recipe sugar syrup, flavored with dark rum
1 recipe Praline Buttercream
½ cup heavy cream, whipped to soft peaks
1 recipe Apricot Glaze
1 recipe Ganache Glaze, prepared just before using
3 tablespoons filberts, toasted and coarsely chopped
Filbert Genoise
Because of the amount of nuts in the recipe, this preparation is different from a classic genoise.
1 ½ cups hazelnuts, toasted/skinned
2/3 cup cake flour, unseived
2 Tbsp. cornstarch
7 large egg yolks
1 cup sugar, divided ¼ & ¾ cups
1 tsp. vanilla extract
½ tsp. grated lemon rind
5 lg. egg whites
¼ cup warm, clarified butter (100 – 110 degrees)
Prep:
- Position rack in the lower 3rd of the oven and preheat to 350/180 degrees.
- Grease and flour a 10” X 2” inch round cake pan.
Using a food processor, processes nuts, cake flour, and cornstarch for about 30 seconds then pulse the mixture about 10 times to get a fine, powdery mixture. You’ll know the nuts are ready when they begin to gather together around the sides of the bowl. While you want to make sure there aren’t any large pieces, don’t over-process. Set aside.
Put the yolks in the bowl of an electric mixer, with the whisk attachment, and beat until thick and light in color, about 3-4 minutes on med-high speed. Slowly, add ¾ cup of sugar. It is best to do so by adding a tablespoon at a time, taking about 3 minutes for this step. When finished, the mixture should be ribbony. Blend in the vanilla and grated lemon rind. Remove and set aside.
Place egg whites in a large, clean bowl of the electric mixer with the whisk attachment and beat on medium speed, until soft peaks. Increase to med-high speed and slowly add the remaining ¼ cup of sugar, over 15-20 seconds or so. Continue to beat for another ½ minute. Add the yolk mixture to the whites and whisk for 1 minute.
Meanwhile, pour the warm butter in a liquid measure cup (or a spouted container). * It must be a deep bottom bowl and work must be fast.*
Put the nut meal in a mesh strainer (or use your hand – working quickly) and sprinkle it in about 2 tablespoons at a time – folding it carefully for about 40 folds. Be sure to exclude any large chunks/pieces of nuts. Again, work quickly and carefully as to not deflate the mixture. When all but about 2 Tbsp. of nut meal remain, quickly and steadily pour the warm butter over the batter. Then, with the remaining nut meal, fold the batter to incorporate, about 13 or so folds.
With a rubber spatula, transfer the batter into the prepared pan, smoothing the surface with the spatula or back of a spoon. **If collected butter remains at the bottom of the bowl, do not add it to the batter! It will impede the cake rising while baking.
Tap the pan on the counter to remove air bubbles and bake in the preheated oven for 30-35 minutes. You’ll know the cake is done when it is springy to the touch and it separates itself from the side of the pan. Remove from oven and allow it to stand for 5 minutes. Invert onto a cake rack sprayed with nonstick coating, removing the pan. Cool the cake completely.
If not using the cake right away, wrap thoroughly in plastic wrap, then in a plastic bag, then in the refrigerator for up to 3 days. If freezing, wrap in foil, then the bag and use within 2-3 months.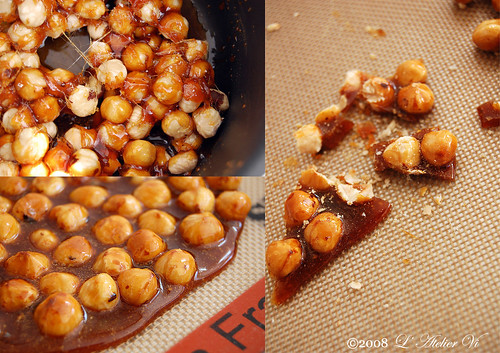
Swiss Buttercream
4 lg. egg whites
¾ cup sugar
1 ½ cups (3 sticks) unsalted butter, slightly firm
1 ½ -2 Tbsp. Cointreau or liqueur of your choice
1 tsp. vanilla extract
Place the egg whites in a large bowl of an electric mixer and beat with the whisk attachment until the whites are foamy and they begin to thicken (just before the soft peak stage). Set the bowl over a saucepan filled with about 2 inches of simmering water, making sure the bowl is not touching the water. Then, whisk in the sugar by adding 1-2 tablespoon of sugar at a time, about 1-2 minute for this step. Continue beating 2-3 minutes or until the whites are warm (about 120 degrees) and the sugar is dissolved. The mixture should look thick and like whipped marshmallows.
Remove from pan and with a whisk attachment, beat the egg whites and sugar on med-high until its a thick, cool meringue – about 5-7 minutes (*Do not overbeat*). Set aside.
Place the butter in a separate clean mixing bowl and, using the paddle attachment, cream the butter at medium speed for 40-60 seconds, or until smooth and creamy. *Do not overbeat or the butter will become too soft*!
On med-low speed, blend the meringue into the butter, about 1-2 Tbsp. at a time, over 1 minute. Add the liqueur and vanilla and mix for 30-45 seconds longer, until thick and creamy. Refrigerate 10-15 minutes before using. Refrigerate in an airtight container for up to 5 days, or can be frozen for up to 6 months. If freezing, store in 2 16-oz. plastic containers and thaw in the refrigerator overnight or at room temperature for several hours.
FAQs for making buttercream:
1. Wait! My buttercream won’t come together! Reheat the buttercream briefly over simmering water for about 5 seconds, stirring with a wooden spoon. Be careful and do not overbeat. The mixture will look broken with some liquid at the bottom of the bowl. Return the bowl to the mixer and whip on medium speed just until the cream comes back together.
2. Wait! My buttercream is too soft! Chill the buttercream in the refrigerator for about 10 minutes and rewhip. If that doesn’t work, cream an additional 2-4 Tbsp. of butter in a small bowl– making sure the butter is not as soft as the original amount, so make sure is cool and smooth. On low speed, quickly add the creamed butter to the buttercream, 1 Tbsp. at a time.
Praline Paste
1 cup (4 ½ oz.) Hazelnuts, toasted/skinless
2/3 cup Sugar
Line a jelly roll pan with parchment and lightly butter. Set aside. Put the sugar in a heavy 10-inch skillet. Heat on low flame until sugar melts around the edges. Do not stir the sugar. Swirl the pan if necessary to prevent the melted sugar from burning. Brush the sides of the pan with water to remove sugar crystals. If the sugar in the center does not melt, stir briefly. When the sugar is completely melted and caramel in color, remove from heat; this process can take 5-15 minutes. Stir in the nuts with a wooden spoon, toss, and separate the clusters. Return to low heat and stir to coat the nuts on all sides, meanwhile use the wooden to separate the clusters. Cook until the mixture starts to bubble (**Handle with care – extremely hot mixture**), then pour onto the parchment lined sheet and spread as evenly as possible. As it cools, it will harden into brittle. To make paste, just break the candied nuts into pieces and place them in the food processor, process for several minutes until the brittle turns into a powder. Do not refrigerate! Store in an airtight container and store in a cool dry place.
Praline Buttercream
1 recipe Swiss Buttercream
1/3 cup praline paste
12 Tbsp. Jamaican rum (optional)
Blend ½ cup buttercream into the paste, and then add to the remaining buttercream. Whip briefly on med-low speed to combine. Blend in rum.
Sugar Syrup
Makes 1 cup, good for one 10-inch cake and can be made in advance.
1 cup water
¼ cup sugar
2 Tbsp. dark rum or orange flavored liqueur (I use Cointreau.)
In a small, yet heavy saucepan, bring the water and sugar to a boil and simmer for 5 minutes. Remove from heat, add the liqueur. Cool slightly before using on the cake.
Apricot Glaze
2/3 cup thick apricot preserves
1 Tbsp. water
Bring the water and preserves to a slow boil in a small heavy saucepan. Simmer for 2-3 minutes. If the mixture begins to stick to the bottom of the saucepan, add water as needed. Remove from heat. Using a strainer, press the mixture through the mesh and discard any remnants. With a pastry brush, apply the glaze onto the cake while the cake is still warm. If the glaze is too thick, thin to a preferred consistency with drops of water.
Ganache Glaze
Makes about 1 cup
6 oz. quality bittersweet chocolate
6 oz. (¾) cup heavy cream
1 tbsp. light corn syrup
1 Tbsp. Cointreau or dark Jamaican rum (optional)
¾ tsp. vanilla extract
½ - 1 tsp. hot water, if needed
Blend vanilla extract and liqueur together and set aside. Break the chocolate into 1-inch pieces and place in the basket of a food processor and pulse until finely chopped. Transfer into a medium sized bowl and set aside.
Heat the cream and corn syrup in a saucepan, on low, until it reached a gentle boil. Once to the gently boil, immediately and carefully pour over the chocolate. Leave it alone for one minute, then slowly stir and mix the chocolate and cream together until the chocolate is melted and incorporated into the cream. Carefully blend in vanilla mixture. If the surface seems oily, add ½ - 1 tsp hot water. The glaze will thicken, but should still be pour-a-ble. If it doesn’t thicken, let it sit for about 5 minutes.
Assembling the cake
Cut a cardboard disk slightly smaller than the cake. Divide the cake into 3 layers and place the first layer top-side down on the disk. Measure out 1 cup of praline buttercream and set aside.
Using a pastry brush, moisten the layer with warm sugar syrup. Spread the bottom layer with a ¼-inch thickness buttercream, leaving ¼-inch border around the edge of the cake. Place the middle layer over the first, brush with sugar syrup, and spreading with buttercream. Moisten the cut side of the 3rd layer with sugar syrup and place cut side down on the cake. Gently, press the sides of the cake to align the layers then refrigerate to chill for at least 30 minutes.
Lift the cake by sliding your palm under the cardboard. Trim the top layer to a slight slant angle so to help the ganache drip over the edge. Brush the top and sides of the cake with warm apricot glaze, sealing the cut areas completely. Chill while you prepare the ganache.
Place a rack over a large shallow pan to catch the ganache drippings. Remove the gateau from the refrigerator and put it the rack. With a metal spatula in hand, and holding the saucepan about 10 inches above the cake, pour the ganache onto the cake’s center. Move the spatula over the top of the ganache about 4 times to get a smooth and mirror-like appearance. The ganache should cover the top and run down the sides of the cake. When the ganache has been poured and is coating the cake, lift one side of the rack and bang it once on the counter to help spread the ganache evenly and break any air bubbles. (Work fast before setting starts.) Patch any bare spots on the sides with a smaller spatula, but do not touch the top after the “bang”. Let the cake stand at least 15 minutes to set after glazing.
Garnishing
Fill a piping bag with the reserved praline cream, and get creative! If you want, sprinkle some chopped filbert garnish (nut meal) on the cake. Refrigerate uncovered for 3-4 hours to allow the cake to set. Remove the cake from the refrigerator at least 3 hours before serving. Leftover cake can be covered with foil and kept in the refrigerator for up to 5 days.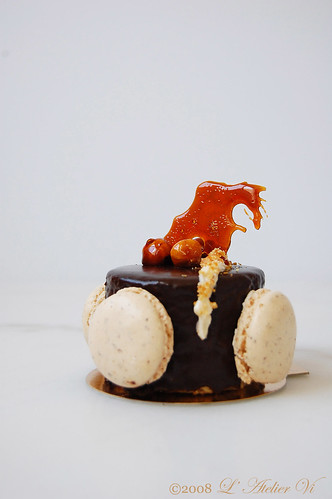
蛋糕是由風味極為香醇富濃重的榛果香氣的榛果海綿蛋糕﹑有著極細緻又柔軟的慕斯口感的焦糖榛果奶油夾心﹑及Valrhona巧克力與君度橙酒調製而成的﹐有如鏡面般的閃耀光澤的甘那許鏡面組合而成。口感濃郁高雅,層次豐富而甘醇,尾韻芳香久久不散,熱愛榛果及巧克力的你絕對會愛上這道濃郁逼人的焦糖榛果奶油夾心巧克力鏡面蛋糕﹗我做了兩個不同的造型﹐圓的小蛋糕是我的Daring Bakers挑戰的指定形狀﹐長方形的是給八月壽星的生日賀禮 (寧﹑Ellen ﹑Frankie生日快樂﹗)~
蛋糕的食譜是由這個月的host - Chris - 摘自Carol Walter的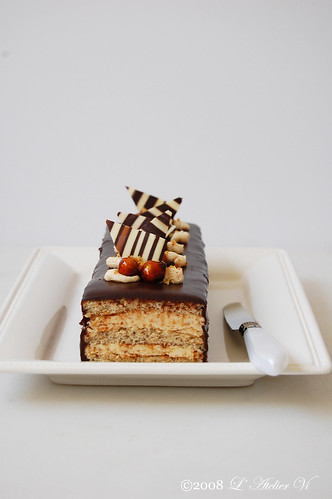
榛果傑諾瓦士(海綿)蛋糕 ~ 十寸蛋糕
因為加了十足份量的榛果﹐所以有別於傳統的製作方法之海綿蛋糕。口感品嚐起來紮實卻不過於厚重,加入切碎的榛果粒,風味極為香醇有濃重的榛果香氣味,不會過甜且保溼性佳,就算等上一段時間才享用,也不失其溼潤口感。
1½ 杯 榛果, 去皮﹑乾燥
2/3 杯 蛋糕麵粉
2 湯匙 玉米粉
7 個 大的蛋黃
1杯 砂糖, 分別盛在¼跟¾杯中
1茶匙 香草精
½茶匙 檸檬皮茸
5 個 大的蛋白
¼杯 溫的澄清無鹽奶油
事前準備:
- 將一烤架移到烤箱下格﹐烤箱預熱至350F/180C。
- 在一個10寸X2寸的方或圓形模具抹上厚厚的奶油,灑上面粉後倒出多餘的粉後﹐備用。
將榛果﹑蛋糕麵粉﹑玉米粉用食物處理器研磨成粉狀﹐備用。用電動攪拌器以中速攪打蛋黃﹐攪打至富含空氣且顏色變淡為止。小量地加進¾杯砂糖,打發至膨脹變白﹐會如緞帶般重疊時﹐即可。拌入香草精及檸檬皮茸﹐用橡皮刀源邊往下刮翻切拌勻﹐備用。另一mixing bowl裡加進蛋白﹐用電動打蛋器以中速將蛋白打發至起泡出現軟角的程度時﹐將速度加至中速打發。小量地加進剩餘的¼杯砂糖,打發1 ½分鐘﹐然後加入打發好的蛋黃﹐繼續打發1分鐘即可。
小量地將榛果粉加進蛋霜中﹐用橡皮刀源邊往下刮翻切拌勻﹐最後加入溫奶油迅速刮翻切拌勻。在烤模旁邊輕輕將麵糊倒進去(如果從中央倒進去時會因重量下沉而致烤完後產生硬塊) ﹐將麵糊推勻﹐輕輕敲一下烤模釋放氣泡後﹐放進預熱過的烤模裡﹐烘烤約30~35分鐘。
等烤到焦色恰到好處時﹐週圍會因烤熟而稍稍縮小﹐烤模和蛋糕體間就會出現空隙﹐輕按蛋糕中間時感覺到彈性即烤好。也可以用竹籤插入中央﹐慢慢拔出時不會沾黏﹐就烤好了。從烤箱取出﹐擺在網架上放涼5分鐘﹐然後翻轉倒扣脫模﹐整個放涼。
如果不立刻使用﹐可將蛋糕包好放冰箱存放﹐可以保存3天。如果放冰格冷藏可以存放2~3個月。使用前靜置回溫即可。
瑞士蛋白霜
4個大的 蛋白
¾杯 砂糖
1½杯 無鹽奶油
1 ½-2湯匙 君度橙酒 (也可用蘭姆酒)
1茶匙 香草精
先煮開一小鍋的水(約兩寸深)備用。Mixing bowl裡加進蛋白﹐用電動打蛋器將蛋白打發至起泡但還沒出現尖角的程度。將mixing bowl放在小鍋上隔熱水(千萬不要直接沾到水)加熱打發﹐小量地加進細砂糖,打發至砂糖完全融化溫度為120F/60C後﹐停止隔熱水加熱﹐繼續仔細打發,直到冷卻出現結實尖角的程度及變的光滑立體狀態為止﹐放冰箱備用。
用電動打蛋器打發奶油至顏色變白﹑紋理細緻且有光澤為止。將蛋白霜加入奶油裡﹐繼續打發攪拌至均勻﹐然後拌入君度橙酒及香草精﹐迅速拌勻。將奶油蛋白霜放冰箱冷藏10~15分鐘即完成。
如果不立刻使用﹐將奶油蛋白霜放入密閉的容器裡放冰箱存放﹐可以保存5天。如果放冰格冷藏可以存放6個月。使用前靜置回溫即可。
製作奶油餡最常遇倒的問題:
~奶油餡看起來有分離的跡像﹗將奶油餡隔熱水加熱5秒﹐看到奶油餡融化時即停止加熱。用木匙稍微攪拌﹐然後用電動打蛋器打發至光滑立體狀態為止。
~奶油餡看起來太軟了﹗將奶油餡放進冰箱冷藏10分鐘後﹐用電動打蛋器打發至光滑立體狀態為止。如果還是不夠立體﹐可以加2~4湯匙的奶油(硬的)至奶油餡中﹐用低速打發至光滑立體狀態為止。
糖榛果膏
1杯 榛果, 去皮﹑乾燥
2/3杯 砂糖
在蛋糕卷專用模具或方形模具上多處塗抹奶油﹐鋪上烤盤紙﹐備用。將砂糖倒入小鍋裡﹐用小火加熱﹐不時輕輕搖一下小鍋使砂糖不會煮焦﹐但千萬不要攪拌砂糖﹐不然會晶化的。待煮至砂糖完全融化呈淺焦糖色(過程約5~15分鐘)﹐離火。一鼓作氣加入榛果﹐用木匙稍微攪拌﹐裹上糖漿﹐再用木匙將榛果堆切開。用小火繼續加熱﹐不停的攪拌至糖漿完全包裹榛果﹐糖漿起泡為止﹐離火。倒在事前準備好的模具上﹐趁熱將其攤平至均勻平整。待冷卻變成硬塊後﹐折成小塊再用食物處理器研磨成粉狀﹐備用。如果不立刻使用﹐將糖榛果膏放入密閉的容器裡放陰涼處存放。千萬不要放冰箱哦﹗
焦糖榛果奶油夾心
1份 瑞士蛋白霜
1/3杯 糖榛果膏
12湯匙 蘭姆酒 (optional)
先將半杯瑞士蛋白霜跟糖榛果膏攪拌均勻﹐然後加入剩餘的瑞士蛋白霜﹐拌勻﹐最後加入蘭姆酒拌勻。
君度糖漿(塗抹蛋糕用) - 1杯
1杯 清水
¼杯 砂糖
2湯匙 君度橙酒 (也可用蘭姆酒)
清水﹑砂糖裝進小鍋裡﹐開中火煮沸後﹐繼續加熱多5分鐘﹐熄火。稍微放涼後加入君度橙酒﹐備用。
杏桃果膠鏡面 - 2/3杯
*為了防水所塗上的﹐不會影響口感
2/3杯 杏桃果醬
1湯匙 清水
將杏桃果醬﹑清水用小火煮開後﹐繼續加熱2-3分鐘。期間如果有黏鍋的跡像﹐再加入1湯匙的清水﹐離火。稍微放涼後﹐過篩杏桃漿。趁熱用毛刷沾取果膠刷於蛋糕表面。
巧克力甘那許鏡面 - 1杯份量
6oz 苦甜巧克力﹐可可含量55%
¾ 杯 鮮奶油
1湯匙 玉米糖漿
1湯匙 君度橙酒 (也可用蘭姆酒)
¾茶匙 香草精
1茶匙 熱開水
混合君度橙酒﹑香草精﹐備用。巧克力用刀子切碎或用食物處理器磨碎後﹐用耐熱容器盛著備用。鮮奶油和玉米糖漿裝進小鍋裡﹐開中火煮沸後﹐一股作氣倒入切碎的巧克力塊裡﹐輕輕搖幾下﹐好讓鮮奶油覆蓋巧克力碎塊﹐靜置1分鐘。用橡皮刀攪拌均勻至順滑看不見碎粒後加入香草精﹐拌勻即可。
組合及裝飾蛋糕:
事前準備:
- 將1杯焦糖榛果奶油夾心留起備用﹐剩餘的分成3份。
- 將海綿蛋糕橫切成三片﹐然後切半(寬5寸乘于2)﹐備用。如果想製作圓形小蛋糕﹐用直徑2寸半的圓形餅乾模吸切出圓蛋糕片。
其中一片蛋糕片表面用刷子塗上君度糖漿之後﹐再用刮刀塗上厚厚的榛果奶油夾心。將另一片蛋糕片的烘烤面朝下疊起﹐再塗上糖漿和厚厚的榛果奶油夾心。同樣地將第3片蛋糕片烘烤面朝下﹐塗上糖漿跟厚厚的榛果奶油夾心重疊上去﹐確實蛋糕片整齊排列後﹐將蛋糕放入冰箱冰涼固定30分鐘。
取出蛋糕﹐切去表面四週的蛋糕體形成小斜角(好讓甘那許鏡面源周邊流下) ﹐然後在表面及四週塗上杏桃果膠鏡面﹐放冰箱備用。將放涼的蛋糕連網架擺放在深的烤盤上﹐將微溫的甘那許鏡面淋在蛋糕上﹐任甘那許溢滿源周邊流下包覆整個蛋糕(連烤盤一起提起輕敲一下會幫助甘那許源邊流下)。記住這時動作要迅速,因為溫度容易下降﹐甘那許會凝固。讓蛋糕靜置凝固15分鐘才可以裝飾蛋糕。在蛋糕上面擠一些焦糖榛果奶油餡﹐再擺放焦糖片﹑2~3粒焦糖榛果﹑及裝飾巧克力片即可。將蛋糕放進冰箱冷藏3個小時固定。吃的時後﹐將蛋糕回室溫就可。
Wednesday, May 28, 2008
DB's May Challenge: Opéra Cake with a touch of spring ~ 法式劇院蛋糕
I wasn’t singing when I found out that the Daring Bakers’ May challenge is L'Opéra cake! From what I know that L'Opéra is a classic French dessert that is super rich, super chocolaty and extremely elegant and polished. Usually made with a classic combination of coffee flavored butter cream and ganache sandwiched with syrup moistened almond sponge (joconde), topped with a bittersweet chocolate glaze. As quoted from the hosts – Lis, Fran, Shea and Ivonne - of this month’s challenge, they wanted to create something lighter in flavor and color in honor of spring so they attempted to create this classic dessert with a twist. To others it may screams delicious but it presents a huge challenge to me since this is my very first time making the Opéra cake >.<
What is Allowed:
- No limits on the shape of the cake (square, round, cupcake or etc.)
- Joconde, syrup, butter cream, ganache/mousse and glaze has to be “light” in flavor and color (vanilla, coconut, honey, banana, almond etc.).
- You can use only the butter cream to fill and top your cake (prior to the glaze) and omit the step of making the ganache/mousse.
- If you do not like the white chocolate glaze, you are free to either leave the glaze out (although a traditional Opéra Cake has a glaze) or you can use another glaze as long as it remains light in color or flavor (vanilla glaze, lemon glaze, etc.).
- You may decorate the outside of your cake in whatever manner you wish (piping, fresh fruit, icing sugar, flowers, etc.).
- Whatever dietary changes are required to meet needs based on allergies, dietary requirements, etc. (But this applies to you only if you have allergies or special dietary needs.)
What is Not Allowed:
- ABSOLUTELY NO DARK COLOURS OR FLAVOURS: no chocolate, coffee, cocoa, etc.
I must say that the cake was not as difficult as I thought it would be. However, it certainly takes time to make. I think the most difficult step is making the butter cream. I had to make it twice because the syrup was too hot (though it reads the right temperature that the recipe called for) that it crystallized when I poured it into the egg mixture! The butter cream tastes devine! I love the texture! Just like the ladies promised – sooooooo creamy! Also, one of the key aspects of getting this dessert to taste better is making all the layers as thin as possible. I think they taste better that way because all these layers of butter cream, joconde and the white chocolate glaze are all rich and you may not want too much of any of these!
Lastly but most important, this month’s challenge is dedicated to Barbara for her support for the LiveSTRONG event by the Lance Armstrong Foundation. Barbara is the force behind A Taste of Yellow, which is an event that unites food bloggers everywhere in the fight against cancer. Here to you, Barbara!
Recipe Sources: Dorie Greenspan’s Paris Sweets and Tish Boyle’s and Timothy Moriarty’s Chocolate Passion.
Joconde/Almond sponge
(Note: this can be made a day in advance and kept wrapped at room temperature.)
6 Lrg. egg whites, at room temperature
2tbsp granulated sugar
2cups ground blanched almonds or ground blanched hazelnuts
2cups icing sugar, sifted
6Lgr. whole eggs
½ cup all-purpose flour
3tbsp unsalted butter, melted and cooled
Divide the oven into thirds by positioning a rack in the upper third of the oven and the lower third of the oven. Preheat the oven to 425◦F /220◦C. Line two 12½ x 15½- inch (31 x 39-cm) jelly-roll pans with parchment paper and brush with melted butter. Set aside.
In the bowl of a stand mixer fitted with the whisk attachment (or using a handheld mixer), beat the egg whites until they form soft peaks. Add the granulated sugar and beat until the peaks are stiff and glossy. If you do not have another mixer bowl, gently scrape the meringue into another bowl and set aside.
If you only have one bowl, wash it after removing the egg whites or if you have a second bowl, use that one. Attach the paddle attachment to the stand mixer (or using a handheld mixer again) and beat the almonds, icing sugar and eggs on medium speed until light and voluminous, about 3 minutes. Add the flour and beat on low speed until the flour is just combined (be very careful not to over mix here!!!).
Using a rubber spatula, gently fold the meringue into the almond mixture and then fold in the melted butter. Divide the batter between the pans and spread it evenly to cover the entire surface of each pan.
Place one jelly-roll pan in the middle of the oven and the second jelly-roll pan in the bottom third of the oven. Bake the cake layers until they are lightly browned and just springy to the touch. This could take anywhere from 5 to 9 minutes depending on your oven.
Put the pans on a heatproof counter and run a sharp knife along the edges of the cake to loosen it from the pan. Cover each with a sheet of parchment or wax paper, turn the pans over, and unmold. Carefully peel away the parchment, then turn the parchment over and use it to cover the cakes. Let the cakes cool to room temperature. 
Amaretto syrup
½ cup water
⅓ cup granulated sugar
2 tbsp Amaretto
Stir all the syrup ingredients together in the saucepan and bring to a boil. Remove from the heat and let cool to room temperature.
Lemon Flavor butter cream
(Note: The butter cream can be made up to 1 month in advance and packed in an airtight container. If made way in advance, you can freeze the butter cream. Alternatively you can refrigerate it for up to 4 days after making it. To use the butter cream simply brings it to room temperature and then beat it briefly to restore its consistency.)
1 cup granulated sugar
¼ cup water
1Lgr. egg
1Lgr. egg yolk
7oz unsalted butter, at room temperature
2tbsp lemon zest
Combine the sugar and water in a small saucepan and warm over medium heat just until the sugar dissolves.
Continue to cook, without stirring, until the syrup reaches 225◦F (107◦C) [*Note: It was too high for me so I lowered it to 200◦F.] on a candy or instant-read thermometer. Once it reaches that temperature, remove the syrup from the heat.
While the syrup is heating, begin whisking the egg and egg yolk at high speed in the bowl of your mixer using the whisk attachment. Whisk them until they are pale and foamy.
When the sugar syrup reaches the correct temperature and you remove it from the heat, reduce the mixer speed to low speed and begin slowly (very slowly) pouring the syrup down the side of the bowl being very careful not to splatter the syrup into the path of the whisk attachment. Some of the syrup will spin onto the sides of the bowl but don’t worry about this and don’t try to stir it into the mixture as it will harden!
Raise the speed to medium-high and continue beating until the eggs are thick and satiny and the mixture is cool to the touch (about 5 minutes or so).
While the egg mixture is beating, place the softened butter in a bowl and mash it with a spatula until you have a soft creamy mass. With the mixer on medium speed, begin adding in two-tablespoon chunks. When all the butter has been incorporated, raise the mixer speed to high and beat until the butter cream is thick and shiny. Add the lemon zest and beat for an additional minute or so.
Refrigerate the butter cream, stirring it often, until it’s set enough (firm enough) to spread when topped with a layer of cake (about 20 minutes).
~Assembling the Opéra Cake~
Line a baking sheet with parchment or wax paper.
Working with one sheet of cake at a time, cut and trim each sheet so that you have two pieces (from each cake so you’ll have four pieces in total): one 10-inch (25-cm) square and one 10 x 5-inch (25 x 12½-cm) rectangle.
Place one square of cake on the baking sheet and moisten it gently with the flavored syrup. Spread about one-third of the butter cream over this layer. Top with the two rectangular pieces of cake, placing them side by side to form a square. Moisten these pieces with the flavored syrup. Spread another third of the butter cream on the cake and then top with the third square of joconde. Use the remaining syrup to wet the joconde. Spread the remaining butter cream on top of the final layer of joconde and then refrigerate until very firm (at least half an hour). Make the glaze and after it has cooled, pour/spread it over the top of the chilled cake. Refrigerate the cake again to set the glaze. Serve the cake slightly chilled. This recipe will yield approximately 20 servings.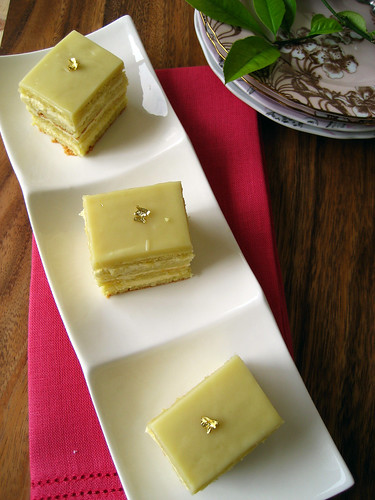
Sunday, April 27, 2008
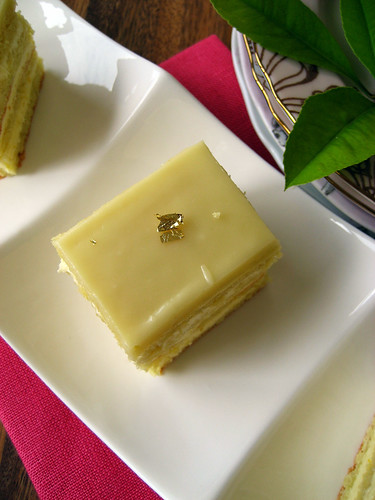
DB's April Challenge: Vanilla Cheesecake Lollipop ~ 香草乳酪蛋糕棒

This month’s Daring Baker's challenge is fun and not as difficult to make! Thanks to Elle and Deborah. With my school’s fashion show around the corner and cakes I have to bake for friends’ birthday, I prayed for an easier challenge. It was such a relief when I found out that we are baking cheesecake (with a twist) coz I am good at baking cheesecake. Well, compared to everything else, that is =) All you need to do is keep mixing with a whisk, bake, and decorate! 100% foolproof!
This month challenge is to make cheesecake lollipop! That is right, cheesecake bite on a stick and dipped in tempered chocolate (flavors up to you); a recipe taken from Jill O’Connor’s beautifully presented Sticky, Chewy, Messy, Gooey book. I have made some adjustments but still managed to stick to the following guidelines:
- Must use the basic cheesecake recipe supplied; you can add a flavor but it has to be white in color. For example, lemon and lime is okay but mocha and coffee is not.
- Must be 2 ounce per serving.
- It can come in shapes of diamond, heart, and flower so it is not restricted to just round.
- The dipping chocolate flavors and colors are completely up to you.
- You can jazz up the pop in whatever toppings.
These cheesecakes would make great entertainment piece at gatherings and parties, especially among children! How would I know? Well, I rounded up the kids of my neighbors and let them be the tasting judges! They all agree that these tasted great and I am the most talented person on earth ^0^
Vanilla New York Cheesecake
Makes 15 Pops
2 ½ 8-oz packages cream cheese or 568g @ room temperature
1 cup caster sugar
1/8 cup all-purpose flour
1/8tsp salt
2 ½ whole eggs
1 egg yolk
1 vanilla pod – split & seeded or 1tsp pure vanilla extract
1/8 cup heavy cream
8-inch lollipop sticks
Boiling water as needed
I thought you should know:
- This cheesecake must be baked using regular cake pan (no removable bottom or springform).
- The recipe said to bake for 35-45 minutes but I had to bake for 80 minutes. Oven temperature slightly differs by brand so best to keep checking.
- It is not stated in the book if the recipe can be halved. However, I decided to try to convert the recipe to fit my 8-inch pan by just dividing everything by 2.
Prep:
- Wrap the cream cheese in plastic food wrap and place in microwave on high for 30 second to soften it.
- Preheat oven to 160 degree C/325 degree F.
- Grease an 8-inch cake pan.
- Boil some water for later use (appx. 2 liter).
Place the cream cheese in a mixing bowl. Using a whisk, beat the cream cheese until blended; add the other ingredients in the following order, sugar --> flour --> salt and beat until smooth. Now add the whole eggs, egg yolk, one at a time, beating well after each addition. Beat in the vanilla seeds/vanilla extract and cream; make sure that each item is well blended before adding another. Strain the cheese mixture then pour into the greased cake pan.
Place the pan in a roasting pan then pour boiling water into the roasting pan until it reaches halfway up the sides of the cake pan. If the water dried out while baking, be sure to refill with more hot water. Once the top of the cake turns slightly golden and the sides begin to pull away from the pan then it is done, about 80 minutes. Remove from oven and let cool completely on wire rack. Place in fridge for at least 3 hours or overnight to set.
Once the cheesecake is firm enough; scoop out 2-ounce balls and place on a food wrap lined plate. Insert a lollipop stick into each cheesecake ball then place in the freezer until very hard, at least 1 – 2 hours. When the cheesecake pops are frozen and ready for dipping, prepare the chocolate.
Bittersweet Chocolate Coating
8 oz bittersweet chocolate – finely chopped
1tbs veggie oil
Chop the chocolate into tiny pieces and place in a heatproof mixing bowl (dry your bowl before using). Temper the chocolate by melting it in the microwave. Need to do it on medium for 4~5 times and at 30 second interval. Stir the chocolate each time the microwave stops until becomes completely melted and smooth. Add the veggie oil and stir until smooth. Cool for 1 minute before dipping the cheesecake pops. 
Assemble time:
Optional - Assorted decorations such as chopped nuts, sweet peppers, sanding sugars, dragees and etc.
Quickly dip a frozen cheesecake pop in the melted chocolate, swirling quickly to coat it completely. Shake off any excess into the melted chocolate. If you like, you can now roll the pops quickly in optional decorations. You can also drizzle them with a contrasting color of melted chocolate (dark chocolate drizzled over milk chocolate or white chocolate over dark chocolate, etc.). Either place the pop on a clean parchment paper-lined baking sheet or stick it into a bowl of rice to set. Repeat with remaining pops, melting more chocolate and shortening as needed. Refrigerate the pops until ready to serve or you can also let it set in room temperature!
By the way, I made 2 birthday cakes, a raspberry mousse cake with rose flavor Chantilly cream and a tiramisu along with the cheesecake pops this weekend! My kitchen is a mess right now!
Here to you two’s birthday; Happy Birthday R & M! 
Friday, February 29, 2008
Labor of L♥ve - French Bread ~ 麵包初接觸
 Third time is a charm. Batard from batch #3.
 Getting better; loaves from batch #4.
I would have never thought that I would be capable of baking bread from scratch! NEVER! It is the most rewarding baking experience I had so far! The sense of accomplishment is overwhelming! Thanks to Sara and Mary , my fellow Daring Bakers, they have chosen this bread as the February challenge =)
I am pretty sure most of you are familiar with the breads you see here because it is nothing but the classic French bread! This got to be the most popular and widely available among all breads! Don’t you agree with me?! I always pick up a baguette for lunch at the bakery near school and I would have never thought one day I would bake it myself ~__~ This particular French bread, is a recipe from the legendary Julia Child. The recipe is so wordy (13 pages!) that I was so dumb found by it, I didn’t have the guts to visit it again until a week before the post time >.<

When I first found out this month’s challenge, I was quite disturbed. I don’t understand that something made up of yeast, water, flour, and salt would take up so much time to make! A total of 8 hours! How am I going to squeeze into my somewhat hectic work/school schedule?! Well, I did manage to squeeze in not 8 hours, not 16 hours, but more like 48 hours! Yes, as you can foresee, a novice baker like me would never get this right the first time! This is my third batch! I almost broke down in tears when I finally got them to look “right”! It is a plus to me that they also taste right, crusty and soft just like the one at the bakery but taste way better because I bake it! If you would like to see the recipe that got me so work up then click here.

French bread is good with a lot of things, cheeses, dips, wines, you name it! The choices are endless. Personally, I like to spread a thick layer of brie and eat that as a quick bite before dinner since dinner is always late at around 8:30pm. It is good for grill cheese panini too! For brunch and small gathering, I brush it with olive oil and grill it to make bruschetta(pronounced brus-ket-ta) . Though I can somewhat say I have accomplished my first bread making challenge, I would just head over to the bakery if I crave it next time because I can’t go through another emotion roller coaster ride!
For the French Bread recipe, click here.
Tomato and Basil Bruschetta
makes 2 cups
1 large vine tomato
2tbs coarsely chopped basil
1tsp extra-virgin olive oil
pinch of salt
some freshly grounded black pepper
1 baguette
Some extra-virgin olive oil for brushing
Dice the tomato and coarsely chop the basil. Combine olive oil, salt and pepper in a large bowl then add the diced tomato and basil to the dressing and toss to coat. Allow to marinate for 15 minutes.
Slice the baguette, on the bias, into 3/4-inch slices. Brush both sides of the bread slices with olive oil and place them on the panini grill until golden brown (for oven - place bread on baking sheet and place in oven instead) for approximately 2 minutes. Remove to a platter, spoon the tomato mixture onto the slices, Sprinkle with pepper and serve immediately.

Monday, January 28, 2008
Daring Bakers - Lemon Meringue Pie ~ 檸檬蛋白派


This is my debut post for Daring Bakers, a community make up of 400+ food bloggers/baking enthusiasts all over the globe. I first heard about DB from Mandy of Fresh from the oven, then Cookworm, then Dessert First. It is great to know that there are so many people out there who share the same passion for baking as me. Click here to learn more Daring Bakers. I have been looking forward to my first post since the day I was put on the roster! When I learnt that we are making lemon meringue pie for the January challenge, I got the blues. Our host for this month is Janet of Canadian Baker, whom has chosen Lemon Meringue Pie as the challenge. You see, I have never baked a pie in my life @_@ (not even those pre-bake one). To prepare myself for this, I’ve been reading the recipe rigorously before so that I won’t fumble when I bake it!
Since I have never baked a pie, I figured that I should follow the recipe to the teeth to avoid failure. I suspect that a novice will pass on this recipe because it involves 3 steps: crust, filling and meringue, all make from scratch! I admitted that I almost want to give up but my competitive nature won’t compromise. Now, I can say I did it! Though I didn’t make the best looking or the tastiest pie but I completed the challenge! The recipe called for a 10 inch pie plate but I only have an 8 inch so I made a few tartlets with the excess. Other than I never baked a pie, I have never tasted a lemon meringue pie (I am not really fond of pastry with fillings because it has loads of sugar.)! I think my pie tastes like a lemon pie but it is kind of runny and not set. I think I removed the filling from heat too soon. The filling is too tart & sweet (is this possible?!) for my taste but the meringue is perfect! It tastes like marshmallow! The crust is so yummy and flaky! I can just eat it by itself! My feedback about this challenge: it was not hard to make but kind of time consuming because of all that chilling time! I think Sunday afternoon would be the ideal time to make this!
You should go see my fellow Daring Bakers’ lemon meringue pies too. Just click here.
Lemon Meringue Pie
("Wanda's Pie in the Sky" by Wanda Beaver)
Makes one 10-inch (25 cm) pie
For the Crust:
3/4 cup (180mL) cold unsalted butter; cut into 1/2 inch (1.2 cm) pieces
2 cups (475mL) all-purpose flour
1/4 cup (60mL) granulated sugar
1/4 tsp (1.2mL) salt
1/3 cup (80mL) ice water
For the Filling:
2 cups (475mL) water
1 cup (240mL) granulated sugar
1/2 cup (120mL) cornstarch
5 egg yolks, beaten
1/4 cup (60mL) butter
3/4 cup (180mL) fresh lemon juice
1 tbsp (15mL) lemon zest
1 tsp (5mL) vanilla extract
For the Meringue:
5 egg whites, room temperature
1/2 tsp (2.5mL) cream of tartar
1/4 tsp (1.2mL) salt
1/2 tsp (2.5mL) vanilla extract
3/4 cup (180mL) granulated sugar
To Make the Crust:
Make sure all ingredients are as cold as possible. Using a food processor or pastry cutter and a large bowl, combine the butter, flour, sugar and salt. Process or cut in until the mixture resembles coarse meal and begins to clump together. Sprinkle with water, let rest 30 seconds and then either process very briefly or cut in with about 15 strokes of the pastry cutter, just until the dough begins to stick together and come away from the sides of the bowl. Turn onto a lightly floured work surface and press together to form a disk. Wrap in plastic and chill for at least 20 minutes.
Allow the dough to warm slightly to room temperature if it is too hard to roll. On a lightly floured board (or countertop) roll the disk to a thickness of 1/8 inch (.3 cm). Cut a circle about 2 inches (5 cm) larger than the pie plate and transfer the pastry into the plate by folding it in half or by rolling it onto the rolling pin. Turn the pastry under, leaving an edge that hangs over the plate about ½ inch (1.2cm). Decorate the edge. Chill for 30 minutes.
Preheat oven to 350ºF (180ºC). Line the crust with foil and fill with metal pie weights or dried beans. Bake for 20 to 25 minutes. Carefully remove the foil and continue baking for 10 to 15 minutes, until golden. Cool completely before filling.
To Make the Filling:
Bring the water to a boil in a large, heavy saucepan. Remove from the heat and let rest 5 minutes. Whisk the sugar and cornstarch together. Add the mixture gradually to the hot water, whisking until completely incorporated. Return to the heat and cook over medium heat, whisking constantly until the mixture comes to a boil. The mixture will be very thick. Add about 1 cup (240mL) of the hot mixture to the beaten egg yolks, whisking until smooth. Whisking vigorously, add the warmed yolks to the pot and continue cooking, stirring constantly, until mixture comes to a boil. Remove from the heat and stir in butter until incorporated. Add the lemon juice, zest and vanilla, stirring until combined. Pour into the prepared crust. Cover with plastic wrap to prevent a skin from forming on the surface, and cool to room temperature.
To Make the Meringue:
Preheat the oven to 375ºF (190ºC). Using an electric mixer beat the egg whites with the cream of tartar, salt and vanilla extract until soft peaks form. Add the sugar gradually, beating until it forms stiff, glossy peaks. Pile onto the cooled pie, bringing the meringue all the way over to the edge of the crust to seal it completely. Bake for 15 to 20 minutes, or until golden. Cool on a rack. Serve within 6 hours to avoid a soggy crust.
Free-Style Lemon Tartlets
("Ripe for Dessert" by David Lebovitz)
Prepare the recipe as above but complete the following steps:
To roll out tartlet dough, slice the dough into 6 pieces. On lightly floured surface, roll each circle of dough into a 5 inch disk. Stack the disks, separated by pieces of plastic wrap, on a plate, and refrigerate for 30 minutes.
To bake the dough, position rack in oven to the centre of oven and preheat to 350ºF (180ºC). Place the disks of dough, evenly spaced, on a baking sheet and bake for 20 to 25 minutes, until golden brown. Cool completely.
To finish tartlets, first place oven rack in the upper third of the oven and increase heat to 425ºF. Divide the lemon filling equally among the disks, mounding it in the centre and leaving a 1-inch border all the way around. Spoon the meringue decoratively over each tartlet, right to the edges, in dramatic swirling peaks.
Return tartlets to oven and bake for about 5 minutes, until the meringue is golden brown.
這可是我烤的第一個派哦﹗如果你有常來這裡就知道我愛做冰涼甜點﹐沒必要根本不想用到烤箱。但我居然加入了Daring Bakers﹐一個不斷壯大的baking狂熱者團體。這個團體每個月都會有挑戰﹐主題由不同的host題出﹐用同一個食譜﹐在同一天發佈在自家的blog。我只能說我不知道哪兒來的勇氣去接受每月的挑戰﹗連我自己也很意外。太衝動了 >___< 但是既然已經說要接受挑戰﹐那就衝吧~~~~~~~~~~~~~~~~~~~~~
因為害怕自己會做不來﹐從一月主題公佈後就天天看那食譜一次。剛看還給它嚇倒﹐因為食譜好長噢﹗光看就覺得需要一天的時間才行。不瞞你說﹐真的有想過放棄。可我很好勝…嗚嗚嗚…這性子害我不淺…嗚嗚嗚…就說這個檸檬蛋白派﹐除了沒做過﹐我也沒吃過﹗我都並不愛吃過甜的東西特別是有餡料的pastry ﹐因為我有超強的健康意識。蛋糕是看它漂亮才吃的﹐而且是和朋友分著吃。那我只好硬著頭皮拼了@__@ ﹗
我花了一整天﹐毀了廚房﹐才烤好我生平的第一個派。我想我的派算是成功的。應該算美味的。就說派皮好酥﹐每一口都充滿奶油香。檸檬餡料對我來說﹐有點過酸及過甜。但是配清甜的蛋白糖霜﹐就剛剛好。而且蛋白糖霜吃起來口感像棉花糖…yummy*Q*
有空就去其他Daring Bakers的家去看看他們的檸檬蛋白派吧﹗一定比我的好的說~
檸檬蛋白派
10吋派盤1個
派皮
¾ 杯 (180ml) 切成小方塊的冷凍奶油/牛油
2杯 (475ml) 中筋麵粉 (all-purpose)
¼ 杯 (60ml) 砂糖
¼ 茶匙 (1.2ml) 鹽
1/3 杯 (80ml) 冰水
餡料
2杯 (475ml) 水
1杯 (240ml) 砂糖
½ 杯 (120ml) 粟粉/玉米粉
¼ 杯 (60ml) 奶油/牛油
¾ 杯 (180ml) 濾過的檸檬汁
1 茶匙 (5ml) 香草精
1大匙檸檬皮絲
5 個雞蛋黃
蛋白糖霜
5 個雞蛋白(室溫)
½ 茶匙 (2.5ml) 塔塔粉
¼ 茶匙 (1.2ml) 鹽
½ 茶匙 (2.5ml) 香草精
¾ 杯 (180ml) 砂糖
製作派皮:
把麵粉、糖、鹽及奶油混合放入食物處理器,拌至呈粗糙麵包屑狀後,加入冰水,稍待30秒,再次攪拌至團狀。不要過度攪拌。將麵團放在撒上麵粉的工作台上,揉至軟滑,輕壓成圓片,蓋上保鮮膜,放進冰箱冷藏至少20分鐘至完全冰涼。
取出麵團(如果麵團過硬,放室溫稍微回軟),放在撒上麵粉的pastry板上,將麵團桿成比派盤大2吋(12吋)厚1/8吋的圓形薄片,用桿麵棒把麵皮捲起,鋪進派盤裡,壓實盤底及盤壁。單手拿起派盤,沿著派盤邊緣把突出的派皮用刀子漂亮地切下一圈。随意裝飾派盤邊緣多餘的派皮或用叉子在派皮邊緣壓出紋路。蓋上保鮮膜,放進冰箱冷藏30分鐘。
烤箱預熱至350℉(180℃)。在派皮鋪上烘焙用紙(牛油紙),加入pie weights 或乾豆至半滿。放入烤箱烤25分鐘。取去烘焙用紙及乾豆,繼續烤15分鐘或至派皮呈金黃色,放涼。
製作餡料:
將水裝進小鍋裡,開中火煮沸,離火。待涼5分鐘。砂糖、粟粉攪拌均勻後,逐漸地拌入熱水裡,拌勻。以中火加熱,不斷輕輕攪拌,煮至變濃稠湯汁。取1杯湯汁拌入打發過的蛋汁裡﹐要一邊注入一邊不停的攪拌至混合,再加進鍋裡。持續不時的攪拌湯汁至煮沸,熄火。拌入奶油至融化混合,再加入檸檬汁、檸檬皮絲及香草精,拌勻。將餡料倒入放涼的派盤裡,用匙背滑平餡料表面,在餡料表面鋪上保鮮膜以防它薄膜產生,放涼。
製作蛋白糖霜:
烤箱預熱至375℉(190℃)。將蛋白、他他粉、鹽及香草精,打至柔軟發泡狀態。小量地加進砂糖,繼續仔細打發至濃稠有光澤,出現尖角為止。將蛋白糖霜倒在檸檬餡料上至完全覆蓋餡料,以免餡料過分受熱而散開。放進烤箱烤15 - 20分鐘至糖霜呈金黃色。烤好後要在鋼架放涼。


