

Well, I know I am fashionably late for this month’s DB challenge hosted by Rosa of Yummy Yums but you know what they say? Better late than never =)
As I mentioned before, my new job is sort of demanding so I couldn’t spend as much time in the kitchen as I wanted to. October challenge almost didn’t happen but since I already missed last month and the month before last, I just couldn’t skip this month’s challenge especially when the challenge is to make pizza dough from scratch! Yup, that is right – I am playing pizzaiolo =]
For this challenge Rosa chose an easy to follow recipe for Pizza Napoletana from Peter Reinhart's The Bread Baker's Apprentice, which promises to yield a beautifully tasty, thin, crispy, yet chewy pizza crust and it was all the above indeed =D
Rosa requests (though not a must) we take pictures or video ourselves when tossing the dough but I found it rather difficult to do with my remote. It turned out to be a blur :,( My tossing didn’t turn out a success either. I think it is because my dough was too small! I will give this another try some other time and shall report back.
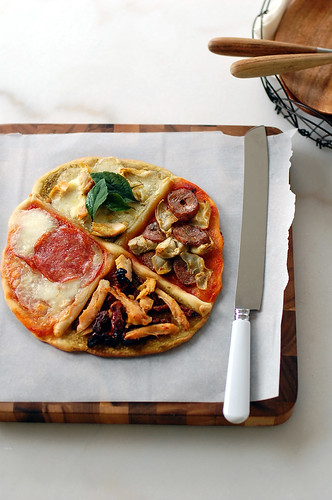
As for the toppings, I couldn’t decide what to put since I wanted everything! So I ended up making a pizza with four different toppings flavor combos – mozzarella + salami, chicken + pesto + sun-dried tomato, sausage + artichoke heart, and chicken + mozzarella! I almost want to make a sweet pizza too but was too full after eating this fully loaded pizza^^
If you want to see more exciting topping variations click here. Enjoy!

Daring Bakers’ October Challenge – Pizza & Toppings
THE CHALLENGE: You have to use the tossing method (as explained below) for at least 2 Pizza Crusts. If you are not comfortable with it, then you can switch to the rolling method, but you HAVE to try the traditional method and exercise it, using at least two dough pieces. You should also capture the moment by either filming or photographing yourself while tossing the dough.
THE RULES: This month’s recipe leaves you with much freedom! You can either make the Pizza Dough gluten-free or the normal way. You may use the sauce (anything liquidy, saucy and spreadable like cream cheese, flavored oils, pesto, Nutella, Peanut Butter, pumpkin puree, etc...) and toppings of your choice, may they be savory or sweet, gluten-free, vegan, vegetarian or non-vegan/vegetarian. You must use BOTH (sauce & toppings).
Posting date: Wednesday, October the 29th 2008
Basic Pizza Dough
Original recipe from The Bread Baker’s Apprentice by Peter Reinhart
Makes 8 pizza crusts (about 8-10 inches)
4 ½ Cups all purpose flour, chilled
1 ¾ tsp salt
1tsp instant yeast
¼ cup olive oil or vegetable oil (both optional, but it’s better with)
1 ¾ cups water, ice cold
1tbs sugar
Extra flour or cornmeal for dusting
Toppings:
mozzarella cheese
grilled chicken
sun-dried tomato
artichoke hearts
sausages
salami
pesto
I thought you should know:
- This will take 2 days to make.
- Bake only one pizza at a time.
- You can also resort to using a rolling pin, although it isn’t as effective as the toss method.
- In case you would be having trouble tossing the dough or if the dough never wants to expand and always springs back, let it rest for approximately 5-20 minutes in order for the gluten to relax fully then try again.
How to store extra dough balls:
You can store the dough balls in a zippered freezer bag if you want to save some of the dough for any future baking. In that case, pour some oil(a few tablespooons only) in a medium bowl and dip each dough ball into the oil, so that it is completely covered in oil. Then put each ball into a separate bag. Store the bags in the freezer for no longer than 3 months. The day before you plan to make pizza, remember to transfer the dough balls from the freezer to the refrigerator.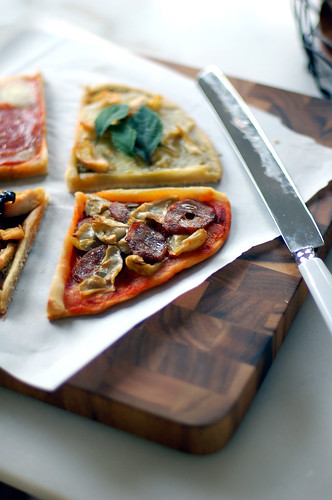
Day 1
Mix together the flour, salt and instant yeast in a big bowl (or in the bowl of a stand mixer like me). Add the oil, sugar and cold water and mix well (with the help of a large wooden spoon or with the paddle attachment, on low speed) in order to form a sticky ball of dough. On a clean surface, knead for about 5-7 minutes, until the dough is smooth and the ingredients are homogeneously distributed. If it is too wet, add a little flour (not too much, though) and if it is too dry add 1 or 2 teaspoons extra water.
Or
If you are using an electric mixer, switch to the dough hook and mix on medium speed for the same amount of time.The dough should clear the sides of the bowl but stick to the bottom of the bowl. If the dough is too wet, sprinkle in a little more flour, so that it clears the sides. If, on the contrary, it clears the bottom of the bowl, dribble in a teaspoon or two of cold water.
The finished dough should be springy, elastic, and sticky, not just tacky, and register 50°-55° F/10°-13° C. Flour a work surface or counter. Line a jelly pan with baking paper/parchment. Lightly oil the paper.
With the help of a dough scraper, cut the dough into 8 equal pieces (or larger if you want to make larger pizzas). Sprinkle some flour over the dough. Make sure your hands are dry and then flour them. Gently round each piece into a ball.
Transfer the dough balls to the lined jelly pan and mist them generously with spray oil. Slip the pan into plastic bag or enclose in plastic food wrap. Put the pan into the refrigerator and let the dough rest overnight or for up to thee days.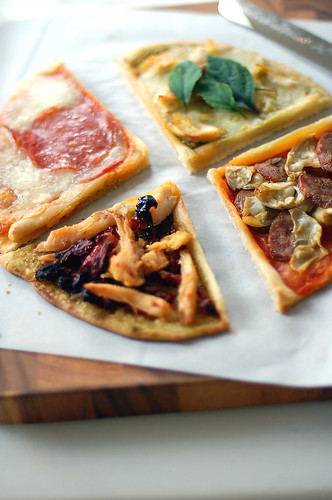
Day 2
On the day you plan to eat pizza, exactly 2 hours before you make it, remove the desired number of dough balls from the refrigerator. Dust the counter with flour and spray lightly with oil. Place the dough balls on a floured surface and sprinkle them with flour. Dust your hands with flour and delicately press the dough into disks about 1/2 inch/1.3 cm thick and 5 inches/12.7 cm in diameter. Sprinkle with flour and mist with oil. Loosely cover the dough rounds with plastic wrap and then allow to rest for 2 hours.
Preheat the oven as hot as possible (500° F/260° C). Generously sprinkle the back of a jelly pan with flour or cornmeal. Flour your hands. Take 1 piece of dough by lifting it with a pastry scraper. Lay the dough across your fists in a very delicate way and carefully stretch it by bouncing it in a circular motion on your hands, and by giving it a little stretch with each bounce and once the dough has expanded outward, move to a full toss.
When the dough has the shape you want, place it on the back of the jelly pan, making sure there is enough flour or cornmeal to allow it to slide and not stick to the pan. Top it with sweet or savory toppings of your choice.
Slide the garnished pizza directly on the jelly pan. Close the door and bake for about 5-8 minutes (it may take longer as no 2 ovens are the same). For an even baking, rotate 180° after 4 minutes. If the top gets done before the bottom, you will need to move the jelly pan to a lower shelf before the next round. On the contrary, if the bottom crisps before the cheese caramelizes, then you will need to raise the stone or jelly.
Take the pizza out of the oven and transfer it to a cutting board or your plate. In order to allow the cheese to set a little, wait 3-5 minutes before slicing or serving.
Thursday, October 30, 2008
October Daring Bakers' Challenge - Playing Pizzaiolo! ~ 挑戰手工薄餅
Subscribe to:
Post Comments (Atom)


It would make a great Japanese picnic dish very elegant. I love the photos. Don't worry about being a little late.
ReplyDeleteYour pizza is beautiful. I just watched Jamie Oliver the other day, he made a similar pizza.
ReplyDeletebeautiful pictures and what an amazing pizza! i love the fact tht there's 4 different bits to it. :)
ReplyDeleteGorgeous photos! I love the idea of spiting the pizza in four! :]
ReplyDelete和平☆
Wow, that looks amazing! I love how you made 4 different kinds in one pizza! Just beautiful.
ReplyDeletethose look GREAT! And I love your blog by the way
ReplyDeleteI almost missed this one too
Your pizzas look yummy!
ReplyDeleteI love how each slice is a different topping!!
ReplyDeleteYour pizza looks delish!
ReplyDeleteI love how you divided it... great idea!
dAriLing Vi`♥
ReplyDelete很久沒來看vi了
希望vi不要忘了寧的說;P
連手工薄餅弄的這成功漂亮*v*
寧真的不得不甘拜下風._.*
對了剛翻看了你9月那個marcaron的post:]
來個bake-off真是個挺不錯的提議>v<
不過..vi要等寧哦
寧要待12月才測完所有科目.加上相機壞了現在要努力儲錢買新的:)
I love your "dividers."
ReplyDeleteI love how you made different compartments for you pizza toppings. Awesome!
ReplyDeleteWhat a neat idea to divide the pizza like that! And the pesto as sauce looks delicious!
ReplyDeleteWow, I love your pizza! Very original and unusual! Great job!
ReplyDeleteCheers,
Rosa
Ah! I'm fairly indecisive about toppings myself, so these look like a perfect way to go! Very well done! :)
ReplyDeleteWhat beautiful photography! The pizza looks beautiful and delish!
ReplyDeleteLOVELY, just lovely looking pizza. Very clever toppings. mmmmmm!
ReplyDeleteVery very pretty! I like what you did with the given recipe :)
ReplyDeleteHey busy girl~~~
ReplyDeleteThis is the last straw... Your pizzaiolo looks fantastic. I think i'm getting the book! ^^
ps. I don't know how you manage to be working/traveling/doing million things at the same time and still managed to bake up a pizzaiolo like this! ^0^
Keep up the great work, but don't overwork yourself, ok? :)
I love your blog Venus...thanks for stoppin' by! If fashionably late means this beautiful post & pictures, then by all means its FINE!! The pizza is wonderful, the pictures stylish & your blog gorgeous!
ReplyDeleteFashionably late, and delicious too. :)
ReplyDelete亂恍剛好恍到你部落﹐在這麼待了半小時慢慢融入你部落里。。真的完全被你部落征服了。。你真的太棒了﹗照片拍得漂亮﹐裝飾又漂亮﹐食物又美味﹐人又細心。。唉。。如果我是男人一定愛上你^^感覺能來到你部落是很幸運跟幸福的事情﹗﹗
ReplyDeleteI love this 4-in-one idea! The pizza looks fantastic!
ReplyDeleteYour gorgeous blog has given me reason to grant you an Excellent award! Come on over to my 11/5 post and get it! :)
ReplyDeleteA big thank you to all my fellow DBs for your warm and encouraging comments! I am looking forward to this month’s challenge =)
ReplyDelete寧寧~
ReplyDeleteHug~~~~~~~~~~~~~
0係度再見到你﹐實在係太開心啦>3<
好呀﹐我就等到你放假先啦﹗
Hi Verano,
ReplyDeleteGlad you have decided to get this book cos you are in for something very special =)
Hmmmm..how did I managed to juggle all the above? Sacrificed my beauty sleep…lol
Hi Faye~
ReplyDelete你的讚美讓我好害羞喔 ~///~
聽到你說喜歡我的部落﹐讓我超開心的。
歡迎以後常來做交流喔~
哈....看來似四季的天氣,香港都食過四季簿餅呀!!!
ReplyDeletethank you so much for this lovely recipe. I shared it with a girl friend and her sons are crazy about it !!!
ReplyDeletebtw, can you post more frequently, your blog is sooooo good.
Hi Ching~
ReplyDeleteI'm glad this pizza is loved^^
I try to post whenever I can as work is sort of demanding. I'll try to post at least 1 post per week as oppose to per every other week =)