


Can’t believe this year is almost over! Come to think about it, lots have happened and some were life-changing events, bad and good. Nevertheless, I have no regret and am looking forward to the year ahead =)
I said I would try to update this space as often as possible but it seem like I need to try harder, which some of you never failed to remind me ;) So what I have been up to? Well, lets see – working on the launch of my event business, fulfilling orders, planning a baby shower, working on a fashion line and that is about it. How do I toggle between, the answer is loads of sugar and caffeine! Talking about sugar, that would bring us to the dessert that I want to share with you =]
I must admit that I haven’t got round to trying as many new recipes as I would like but this one involving pears is one of the new ones that I tried! It is adopted from one of my Japanese dessert books. I’m not a big fan of pears but thought it looked refreshingly lovely and would give it a go. Nothing complicated involved; you just need to make or buy some caramel for the biscuit, make the biscuit, make the crème anglaise and fold it with whipped cream to make the mousse then flavor it with the Poire William liqueur. Taste wise, the liqueur’s fruity note is in every bite but it is not overpowering. It was good but not great, though others loved it – enough for them to put in requests for more pear-oriented desserts…I’m not sure if I’m ready for more, but maybe given time…
May the Holiday Season bring only happiness and joy to you and your loved ones. Peace On Earth and best wishes throughout the New Year~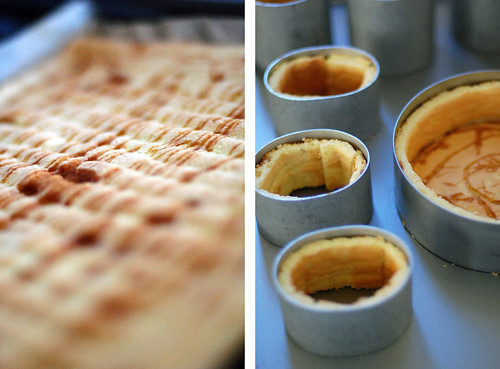
Poire William Mousse with Caramel Biscuit – make 8 -10 individual cakes
Caramel Sauce
275g caster sugar
110ml whipping cream
135g unsalted butter, coarsely chopped
1/3cup water
1tsp fleur de sel
Combine sugar and water in a saucepan and stir over medium heat until sugar dissolves. Bring to a boil and cook for 8-10 minutes or until dark-amber in color then remove from heat. Carefully add cream, butter and fleur de sel (mixture will spit) and stir. Return to heat and cook for 3 minutes or until smooth, remove from heat. Pour caramel into an airtight container, let cool and store in the refrigerator.
Caramel Biscuit Cake
Italian Meringue
4 medium egg whites
80g caster sugar
4 medium egg yolks
20g caster sugar
60g cake flour
40g cornstarch
3tbsps caramel sauce
Preheat oven to 425°F/210°C. Grease a 43cm x 30cm jelly roll sheet with butter and line it with parchment paper, set aside. Sift together the cake flour and cornstarch twice then set aside.
In a dry clean bowl, whip the egg whites on medium speed until foamy and the color turns white. Gradually add the sugar, increase the speed to high and continue to whip until stiff peaks form – the whites should be firm and shiny, about 5 minutes.
Whisk the egg yolks with the sugar until pale and creamy. With a rubber spatula, gently fold 1/3 of the meringue into the egg mixture until just combined then fold in the rest of the meringue and fold until just incorporated. Add in the sifted flour mix and gently fold until combined.
Fit a piping bag with a 3/8 inch (1cm) round tip, fill it with the cake batter and pipe identical wavy lines touching each other. Using a spoon, drizzle some warm caramel sauce over piped batter.
Bake for 10 minutes or until golden. Remove from oven and transfer to cool on the cooling rack. Once cooled, using a ruler cut out stripes that are slightly shorter than the height of the mousse rings that you’re using. Also, stamp out cake bases using mousse cake moulds. Place the mousse moulds on a tray, roll up a cake stripe, place it inside the mould then put a cake base inside each mould; set aside.
Poire William Mousse
Crème Anglaise
175ml whole milk
8 medium egg yolks
60g caster sugar
8g powered gelatin
40ml water
½tsp vanilla extract
350ml heavy whipping cream
45ml Poire William liqueur
For the crème anglaise:
Sprinkle the powdered gelatin over 40ml of water. Bring the milk to about simmer over medium heat. Meanwhile, whisk the egg yolks with the sugar until pale and creamy. Remove from the heat and add a little of the hot milk to the yolk mixture to warm it, whisking constantly to keep the yolks from cooking then pour the egg yolk mixture into the hot milk (pan), whisking constantly as you pour.
Return the mixture to the stove and warm it over medium heat, whisking constantly. Let the custard cook until custard is thick enough to coat the back of a spoon, 3 - 5 minutes then remove from heat. Add in the pre-soaked gelatin, stirring until completely dissolved. Using a fine sieve, strain the custard into a clean bowl then whisk in the vanilla extract, stir to cool.
For the whipped cream:
Beat the heavy cream over medium speed until soft peaks form. Gently fold the whipped cream into the crème anglaise, fold until just combined. Fold in the liqueur until incorporated. Pour mousse into mousse cake moulds lined with caramel biscuit till full and level with an icing knife, place in fridge to set for at least 3 hours or overnight.
Chantilly Cream – 1½ cups
200ml heavy cream
2tbsp caster sugar
Place the cream and sugar in a bowl and whip until semi-stiff peaks form over medium speed. Chill in the fridge if not noting immediately.
Decorating the cakes:
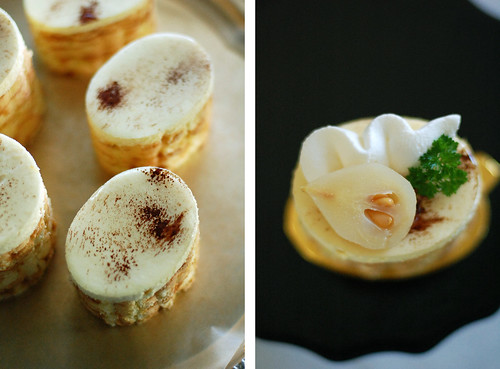
Using a fine sieve, gently sift cocoa powder (sparingly) over the cakes. Spread a thin layer of nappage (natural glaze diluted 1:10 ratio) using an icing knife - move the knife over the top of the glaze to get a smooth and mirror-like appearance.
Unmold the cakes by wrapping a hot towel around the mould for 10 second then use your fingers to push the cake upward, repeat this process with the rest of the cakes. Pipe some Chantilly cream on top then finish with half of a mini pear and a sprig of parsley.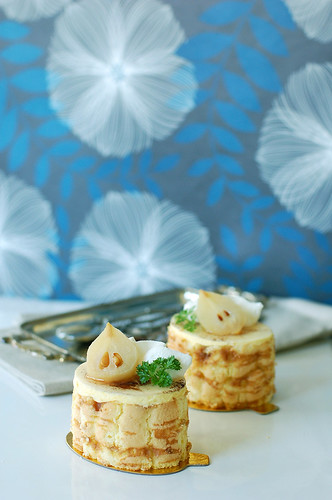
2009眼看就快過完了﹐時間真的是不等人的﹗今年發生了好些事情﹐但還是走過來了也過的更精彩﹐未來也要過的更好 - 這是對自己的承諾。2010好讓人期待哦~
很抱歉﹐我食言了 - 就我說我會多更新布落格但好像沒了這回事。本來也沒感到愧疚的我﹐經由某些好心人不厭其煩的提醒﹐良心發現了。。。呵呵呵。。。我可沒在偷懶喔﹗那究竟Vi在忙啥呢﹖你還記得我在規劃在網上開店的事嗎﹖現在忙著最後的網頁設計還有logo。除了這個還有忙著接甜點訂單﹐在規劃好友的baby shower ﹐還有在為自己的時裝品牌在努力。雖然我沒更新但並不代表說我沒在弄甜點吃喔﹗你也知道鐵人也需要能量的﹐何況是我這個小小女生(不認老)呢﹖而我的能量補給就是數不盡的咖啡因跟甜點。又因很挑食﹐所以非得自己弄來吃不可。都是一些草莓蛋糕什麼的﹐但偶而也會嘗試新的甜點﹐以下這個以洋梨為主的慕斯蛋糕就是其一。
我不是梨子的粉絲﹐但是在我收藏的日文甜點書中看到這道點心有給它清新可愛的模樣吸引到﹐覺得不妨試試﹐好在也不複雜 - 就焦糖風味的餅皮包裹著由英式蛋黃醬﹑打發到7分的鮮奶油再跟洋梨利口酒混合做成的慕斯。簡單是不﹖小心不要將焦糖跟英式蛋黃醬煮壞﹐要叮緊一點。雖然我是自己製作焦糖醬但可用市售品代替。蛋糕不錯吃﹐但不是會讓我一吃再吃的那種﹐但也有人不認同﹐覺得好吃到不行還問什麼時候再製作以梨子為主的甜點呢﹗
祝有個愉快又窩心的聖誕節﹗May the Holiday Season bring only happiness and joy to you and your loved ones. Peace On Earth and best wishes throughout the New Year~
小巧洋梨餅皮慕斯蛋糕 – 8 - 10 個小蛋糕
焦糖醬
275g 細砂糖
110ml 鮮奶油
135g 無鹽奶油, 切丁
1/3杯 清水
1茶匙 fleur de sel 海鹽
將細砂糖和水倒入小鍋裡﹐用中火加熱﹐不停的攪拌至細砂糖完全融化。煮沸後繼續煮﹐不時輕輕搖一下小鍋使糖漿不會煮焦﹐待煮至砂糖完全融化呈深琥珀色(過程約8 -10分鐘)﹐離火。慢慢地注入鮮奶油﹐其間不停的攪拌﹐然後加入奶油(會有分離的跡象)及fleur de sel 海鹽 ﹐攪拌勻。用小火繼續加熱煮3分鐘至奶琥珀色及滑順﹐離火。將焦糖醬倒入密閉的容器裡﹐稍微放涼﹐放冰箱存放。
焦糖餅皮
義式蛋白霜
4個 中尺寸蛋白
80g 細砂糖
4 個 中尺寸蛋黃
20g 細砂糖
60g 低筋麵粉
40g 玉米粉
3湯匙 焦糖醬
事前準備:
- 將一烤架移到烤箱中格﹐烤箱預熱至425°F/210°C。
- 在1個43cm x 30cm的烤盤中鋪上烘烤紙。
將低筋麵粉和玉米粉混合過篩2次﹐備用。用電動攪拌機先以中速將蛋白打發至起泡、顏色變白﹐將砂糖分成2 - 3回加入蛋白中﹐仔細發泡﹐轉高速打至出現尖角成立體型蛋白霜﹐5分鐘。
在另1個大的鋼盆裡加進蛋黃跟砂糖﹐用電動攪拌機以中速攪打至富含空氣且顏色變淡為止。將1/3量的蛋白霜拌入蛋黃糊裡﹐用橡皮刀源邊往下刮翻方式迅速切拌勻後再拌入剩下的蛋白霜﹐拌勻﹐然後加進篩過的粉類﹐攪拌至粉末完全消失為止。
將麵糊倒進裝上直徑3/8寸(1cm)的圓形擠花嘴的擠花袋中﹐在烤盤上將麵糊擠成瓦片狀。用湯匙舀起微溫的焦糖醬﹐從麵糊的上方以細線狀滴落。用425°F/210°C的烤箱烘烤10分鐘至金黃色﹐取出後放網架上靜置放涼。如果不立刻使用﹐可將蛋糕包好放冰箱存放﹐可以保存3天。使用前靜置回溫即可。
將蛋糕體切成比慕斯模矮3/8寸(1cm) 的長方形條狀﹐再用慕斯模吸切出蛋糕片底座。將中空慕斯模擺放好﹐然後在每個模型中嵌進蛋糕條跟蛋糕片底座﹐備用。
洋梨慕斯
英式蛋黃醬
175ml 牛奶
8個 中尺寸蛋黃
60g 細砂糖
8g 明膠粉
40ml 清水
½茶匙 香草荳精
350ml 鮮奶油
45ml 洋梨利口酒
將明膠粉撒進40ml的水中泡脹。將牛奶倒進小鍋裡,以中低火煮至冒泡即離火。同時間﹐在鋼盆裡加進蛋黃跟砂糖﹐用電動攪拌機以中速攪打至富含空氣且顏色變淡為止。將1/3量的熱奶慢慢地注入蛋糊中﹐這時要用打蛋器不斷攪打﹐拌勻後﹐倒回小鍋中﹐邊倒邊用打蛋器攪拌﹐再以中低火加熱。用木匙持續不斷的攪拌至變稠又順滑並可以在木匙背劃出清晰的線條時(3 - 5分鐘)﹐蛋黃醬就完成了﹐離火。加入泡軟的明膠片,確實融化拌勻後將蛋黃醬過濾到大碗中﹐然後拌進香草荳精﹐攪拌勻﹐放涼。
將鮮奶油用電動攪拌機先以低速打發至起泡﹐再轉中速攪打至出現軟角的程度﹐然後拌入放涼的蛋黃醬中﹐用橡皮刀源邊往下刮翻切拌勻﹐再拌入洋梨利口酒確實拌勻即可。將慕斯倒進已嵌進蛋糕片的中空模中至滿﹐用抹刀將多餘的慕斯刮除﹐將表面均勻漂亮地抹平﹐放進冰箱冷藏凝固﹐至少3小時或一個晚上。
香堤麗鮮奶油 – 約1 ½ 杯份量
200ml 鮮奶油
2湯匙 細砂糖
將鮮奶油和細砂糖放入mixing bowl裡﹐用電動攪拌器先以低速打發鮮奶油至起泡﹐再轉中速攪打至出現尖角的程度。若不立刻使用﹐將鮮奶油放冰箱冷藏著。
裝飾蛋糕:
用篩網將可可粉零散地篩在蛋糕表面﹐然後將微溫的鏡面果膠(以水1 ﹕果膠10比例﹐加熱融化再放涼)淋在蛋糕正上方﹐再迅速地用抹刀抹平。將慕斯脫模: 以溫毛巾圍著模型溫熱10秒後﹐用手指將慕斯往上推出脫模。在蛋糕表面擠上適量香堤麗鮮奶油﹐最後再以迷你洋梨跟細葉芹點綴即可。
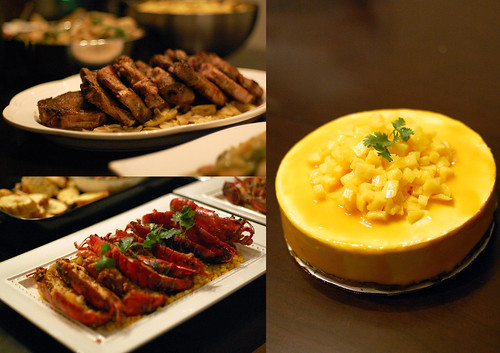
Oh, as promised, here is a recap of my 1st big girl Thanksgiving dinner!!
這是我人生做的第一頓感恩節晚餐﹐還可以吧﹖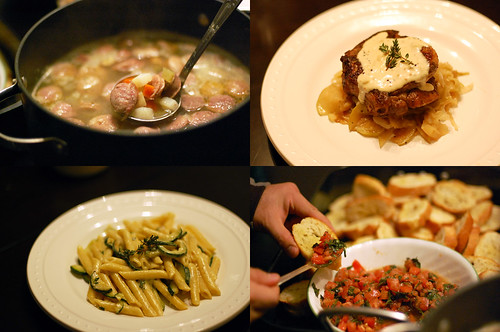
Wednesday, December 23, 2009
Poire William Mousse with Caramel Biscuit ~ 小巧洋梨餅皮慕斯蛋糕
Subscribe to:
Post Comments (Atom)


Vi, just want to say Merry Christmas!!! :D
ReplyDeleteDear Venus,
ReplyDeleteMerry Christmas & Happy New Year to you & your family! ^^
Stunning creations & photography once again!
ReplyDeleteMerry X'mas & Happy 2010 to you, too!!
Pei-Lin
vi, 閱讀你的網誌已有一段日子,看見你為朋友/家人烹煮感恩節晚餐,實在禁不住要跟你說聲:「雖然沒有機會嚐嚐,但只憑賣相也感受到你煮菜有多用心,用心煮菜必會好味呢!」亦想值此跟你說:「很欣賞你詳細描述食譜的那股熱誠,做出那麼精緻的甜點,拍出如此高素質的相片供大家分享。謝謝你的無私呢!」
ReplyDelete在這喜氣洋洋的日子,亦祝你聖誕快樂,新年進步!
Merry Christmas~~
ReplyDeleteVi, 祝妳年年都有快樂的聖誕節。
ReplyDeleteGorgeous dessert! I have some beautiful pears that would be perfect for this!
ReplyDeleteJust the perfect biscuit for this festive! :)
ReplyDeleteHave a Jolly Good New Year!
oh..your thanksgiving dinner looks so great!! is very good for the first time!!! well done!!
ReplyDeleteHappy New Year Vi!!
年年都回顧自己,感恩一番....
ReplyDelete你的蛋糕很美,這一餐也很美味....
祝你
新年快樂呀!!!
Thanks all♥
ReplyDeleteBest wishes for a happy and prosperous New Year!
Dear Vi~
ReplyDeleteHappy New Year! I've been super busy too and never got time to try new recipes anymore..:( But I'm lucky that I get to see yours...:)
Always love and admire your 巧手慧心~^^
Glad to hear that your business is almost open! Best of luck in 2010!
Cheers,
Martini
博主你太强了,方便问一下你这都是自己研究的,还是专门学过的?
ReplyDelete顺便说一下,新年快乐!
很欣賞,無論攝影、廚藝都很有品味,有個不折不扣的人生
ReplyDelete好精緻啊!! 你的出品永遠一眼就認得出.. Happy new year!! Wish you all the best!!
ReplyDeleteHello Martini - It is great to hear from you =)
ReplyDeleteI haven't been in the kitchen much either but am trying to do more in 2010. Wish you the best in 2010!
Bear17 - 謝謝你的留言♥ 我是學時裝設計的﹐烹飪是業余﹐貪好玩的跟著書學的;)
感恩回饋 - 謝謝你呀﹗有空常來♥
豬小姐 - long time no see! hug~~~
Hey 阿Vi,好高興看到你的更新..之前圣誕家回中國啦..國內好像上不來你的部落格,回到多倫多就第一時間過來看了...我猜你新年一定會更新的~果不其然.哈哈..無論你做什么甜點,拍什么樣的照片,一樣都是那么的討人喜歡,看的人真的時候口水嘩啦啦的流啊...我常推薦朋友看你的blog呢..哈...我的學習榜樣和目標啊~~~新年里,一定很忙吧,as you said, try harder 更新部落格哦!!!
ReplyDelete永遠支持你:)
Andrea
Vi
ReplyDelete你的点心做的那么多好,圣诞大餐就是一定没得说的。你的博客我每个星期都有来看,还以为你一直没有更新呢,闹了半天都是在右侧显示小图片啊。我都看看只看第一片博文:)很高兴看到你更新啦~~
OMG. Ur blog rocks my socks off... even though i wont ever be doing macaroons. hehe. omg.... u should open ur own shop. its gonna be ahhhmazing!
ReplyDeletemarki
ViVi,
ReplyDeletethe cake look so elegant, & i like the dinner a lot!
Can u tell me how to make the tomato dish that u put on the baguette? it looks so nice & simple~
Andrea – Hi dear! Hug~ 你人真好﹐每次看到你的留言都感到很窩心。我會盡可能多更新的啦(笑) ﹗
ReplyDeletecicipeng - 哈哈﹐原來是這麼一回事呀﹗
marki – Hello and welcome to my blog! Thanks so much for your wonderful comment!
shing chit – Oops, sorry for replying so late! This dish is an Italian starter calls bruschetta. I posted the recipe once before and it is here:
http://lateliervi.blogspot.com/2008/02/labor-of-lve-french-bread.html